인기 검색 계정


Nicole Keshishian | KALEJUNKIE®(@kalejunkie) 인스타그램 상세 프로필 분석: 팔로워 3,054,646, 참여율 0.15%

@kalejunkie
인증됨Nicole Keshishian | KALEJUNKIE®
What to cook tonight, solved Cookbook author & former lawyer, sharing healthy recipes, fitness, travel & life ✨ Partner: nicole@kalejunkie.com
https://kalejunkie.komi.io/@kalejunkie님과 연관된 프로필

healthygirlkitchen

fooddolls

olivia.adriance

maxiskitchen

choosingchia

jenneatsgoood

foodbymaria

halfbakedharvest

kalememaybe

shredhappens

katcancook


@kalejunkie 계정 통계 차트
게시물 타입 분포
시간대별 활동 분석 (최근 게시물 기준)
@kalejunkie 최근 게시물 상세 분석
동영상 게시물 분석
여러 장 게시물 분석
@kalejunkie 최근 게시물

Everything I did this holiday weekend: 🥩🍷⚽️ 🏋🏻♀️ 🎆 Happy 4th everyone 🇺🇸!!

Hi hi!! 👋🏼 There are a lot of new faces here—welcome to my page, @kalejunkie 🥬, where I share recipes and life content. I think it’s important to know the people you follow, so here’s my story condensed into these slides ❤️. I’m so happy you are here and would love to know something about you—favorite food? where are you from? something I should know about you? what would you like me to create for you? xo, Nicole

Idk about you, but I have an entirely different personality in NYC 🍎🗽 1. balcony shot after i got my makeup done for a party (@amy.katepalmer @bareminerals) 2. Pizza, bc when in nyc 🍕 3. Steak & eggs @jackswifefreda 4. Walking past @nyuniversity, my alma mater 5. Hangs with my manager @ellewulff @therealdba 6. The best froyo I’ve ever had @mimis.ny with @healthwithhunter 7. Glammed up for @therealdba 15th anniversary party 🎉 8. A moment for the lady 👛 9. Trying out the new @12.matcha 10. 🍵 x 4 11. View from my room @ludlowhotelnyc 12. Fav casual sushi handroll spot @naminori.us 13. More views 14. When you have love, you have everything 15. Spicy skinny marg, but wtf they didn’t have @lalospirits 🙂↔️ 16. Thank god I didn’t have to share this ocean trout sashimi @naminori.us 17. Got myself a cozy new fall coat from @sezane 🥐

want good digestion when traveling? Yes, you do, because nothing will ruin your trip faster than when you feel bloated and can’t go 😜. And yes I’m speaking from years of experience. What to do? I drink 3 glasses of water for every drink (yes you will pee a lot), daily steps & exercise, and drink 1 packet of @promix debloat every day of your trip. Use code KALEJUNKIE10 to save $ and comment LINK below and I’ll DM you the info. You’re welcome, it works.
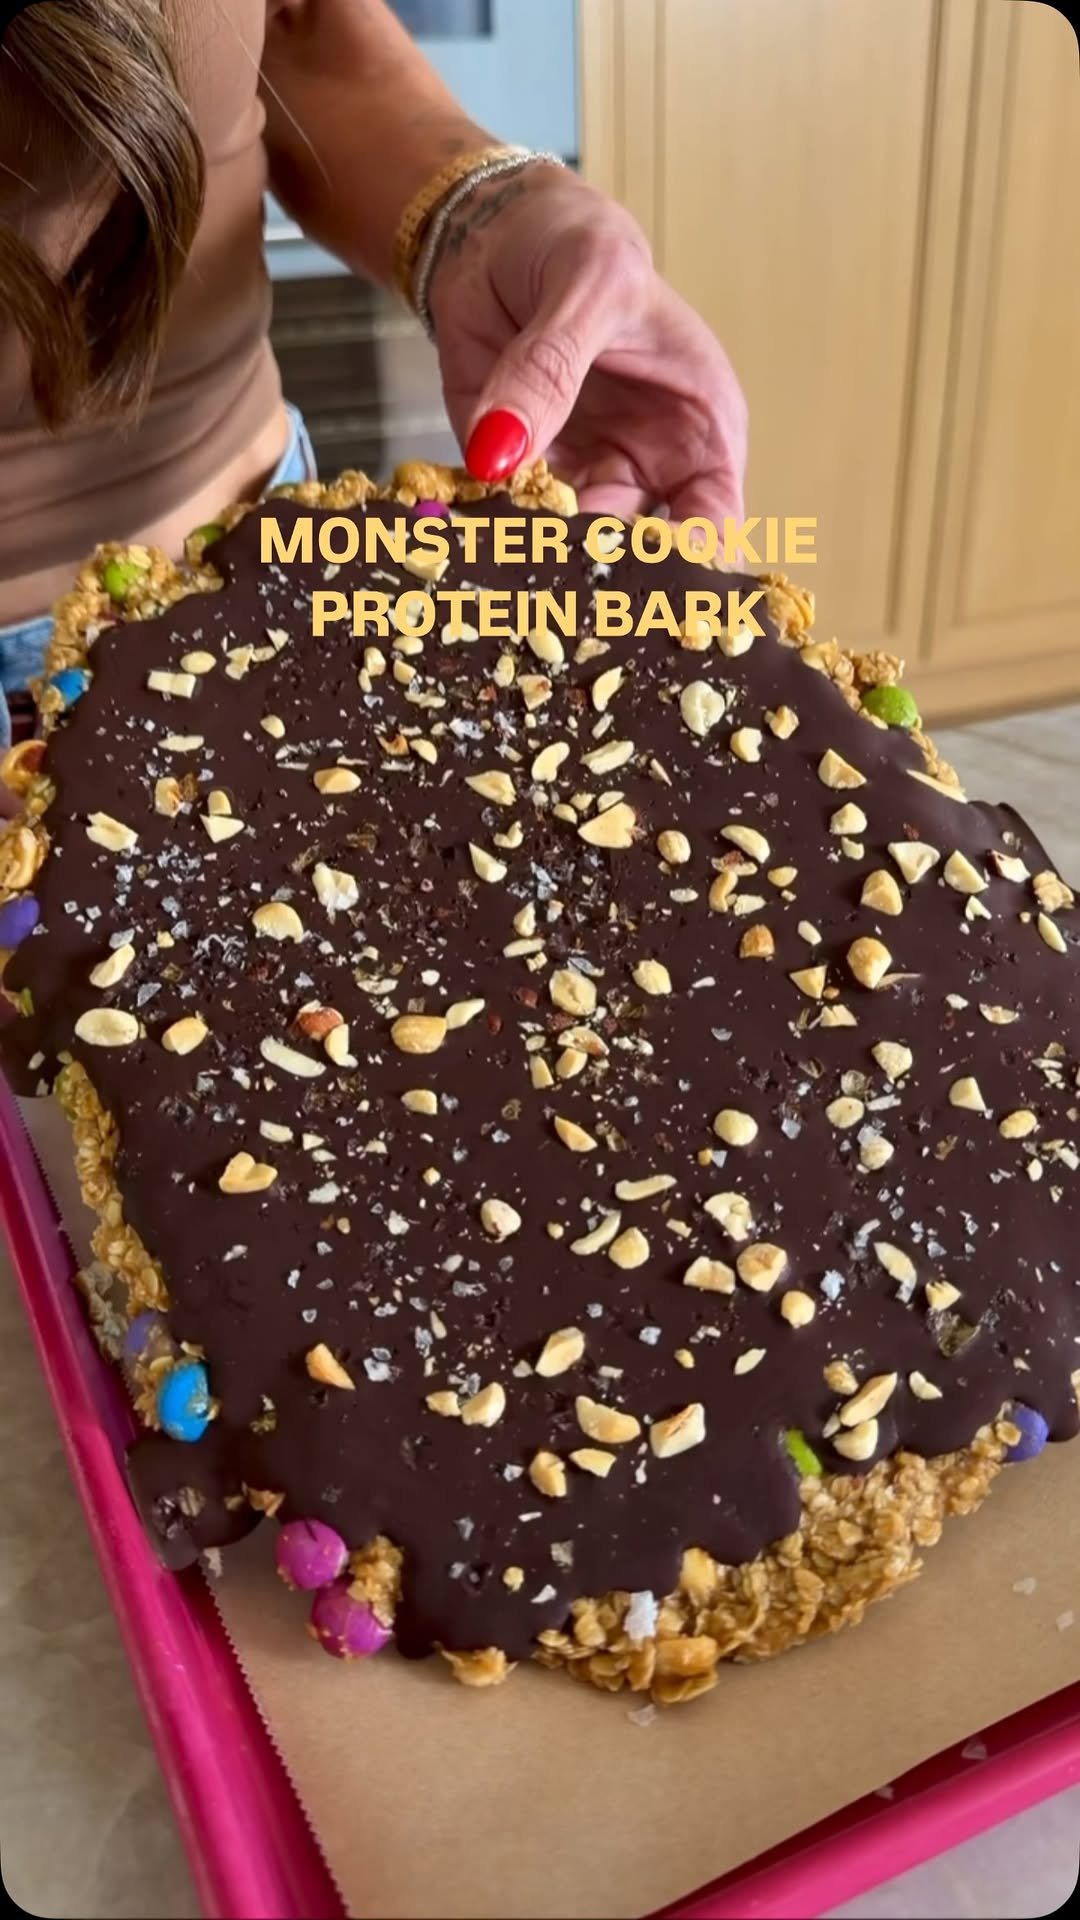
@kalejunkie 🍪 MONSTER COOKIE PROTEIN BARK, my fav no-bake sweet treat to break into pieces and enjoy all week long! My boys love it too, so it’s a win-win! Store it in the refrigerator, but I personally love it from the freezer—it hits different and it’s goes great broken down into tiny pieces and served over vanilla ice cream, just saying 😏. Macros: ~7g p • ~20g c • ~7g f SAVE this post, SHARE with friends and FOLLOW ME @kalejunkie if you want to see more recipes like this! Makes 16 servings 1 cup quick cook rolled oats 1/3 cup powdered peanut butter (like PB2 or Naked PB) 1/3 cup collagen powder (or protein powder) 1/3 cup maple syrup 1/4 cup coconut oil, melted 2 tsp vanilla extract 1/2 cup salted peanuts 3/4 cup @unreal.snacks chocolate gems 3/4 cup chocolate chips (@hukitchen) 1 tsp coconut oil In a large bowl, mix together the oats, powdered PB, collagen, maple syrup, melted coconut oil and vanilla extract. Everything should be coated well. Add in most of the peanuts (reserving some to chop and use as topping) and the chocolate gems. Once everything is mixed together well, line a quarter sheet baking sheet with parchment paper press the mixture into an even layer. I like to spray my hands with oil spray so it’s easy to work with and doesn’t stick. Next, make the chocolate topping. In a small bowl, add the chocolate chips and coconut oil and microwave in 2 to 3, 30-second increments until smooth and fully melted. Pour the chocolate mixture over the top and spread into an even layer using a spatula. Crush remain remaining peanuts and spread over the top and sprinkle with flaky salt. Freeze for at least one hour to harden. Cut or break into smaller pieces and enjoy. #healthydesserts #monstercookies #proteindesserts

Who’s excited for the game?!? I am!! 😜 #worldcupfinal
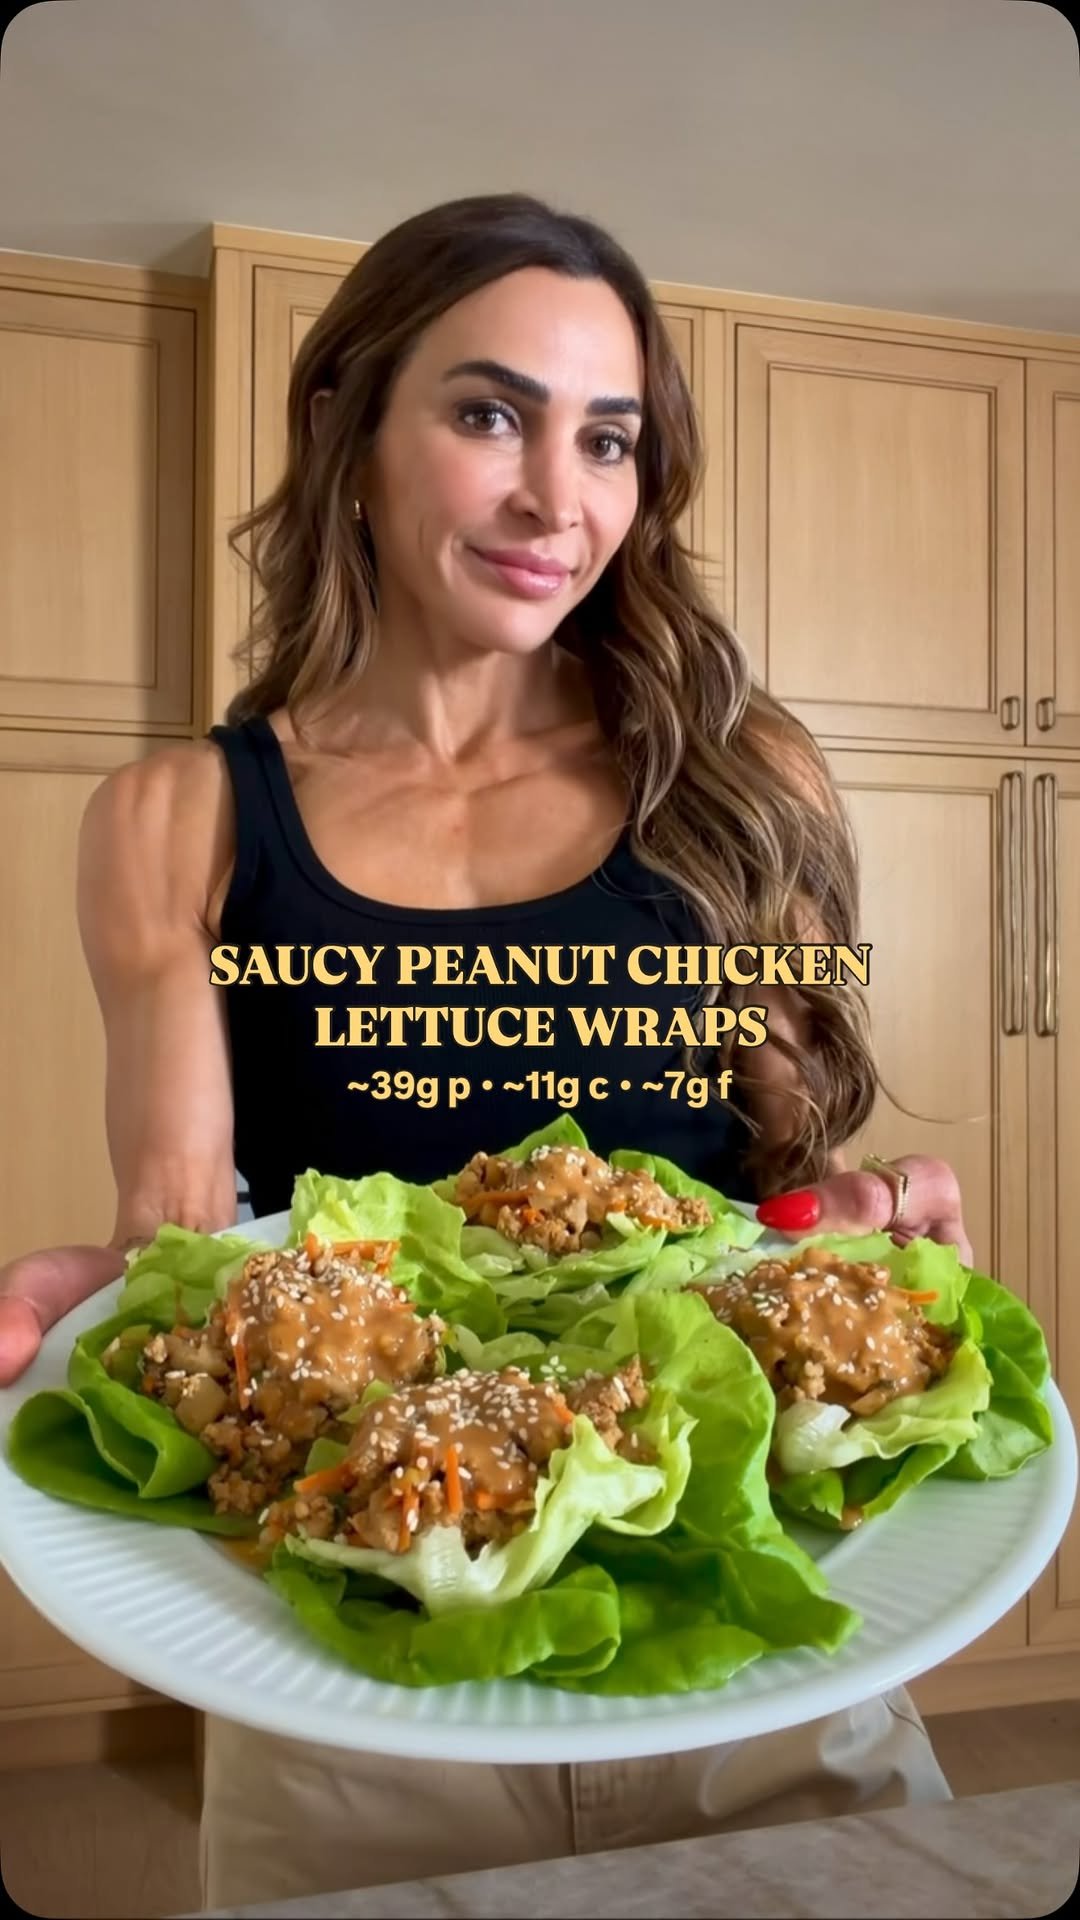
@kalejunkie SAUCY PEANUT CHICKEN LETTUCE WRAPS! Macros: ~39g p • ~11g c • ~7g f 🙌🏼 These peanut chicken lettuce wraps check every box—high in protein, low in fat, and nutritious enough to eat every day and keep in your daily rotation. The saucy chicken mixture great served in lettuce wraps or if you are avoiding lettuce like the plague then just stuff the mixture in a wrap or serve it over rice and call it a day 😮💨. FOLLOW me @kalejunkie for more easy, delicious protein-forward recipes!😊 Makes 6 servings Avocado oil spray 2 lbs ground chicken (98/2 to keep this lean 💪🏼) 1 small white onion, diced 4 cloves garlic, minced 1 tb fresh ginger, minced 1 1/2 cups carrots, shredded 1 8oz can water chestnuts, drained and diced 6 green onions, finely sliced Butter lettuce leaves, for serving Sesame seeds for garnish Sauce for chicken 1/2 cup low sodium soy sauce 3 tb rice vinegar 2 tb hoisin sauce 1 tb maple syrup 2 tb creamy peanut butter 2 tsp corn starch (or arrowroot or tapioca flour) 2 tb water Peanut sauce topping (optional) 1/3 cup creamy peanut butter 2 tb rice vinegar 2 tsp maple syrup 3 tb low sodium soy sauce 1 tb sriracha 3 tb water, to thin First, make the sauce for the chicken. Add all of the sauce ingredients to a bowl and whisk until smooth. Heat a large non-stick skillet over medium-high heat and spray the pan with avocado oil spray. Once hot, add the onion, garlic and ginger. Sauté for 4 minutes or so, until the onions begin to soften. Add the ground chicken, breaking it down into tiny pieces. Once the chicken is mostly cooked through, add the carrots, water chestnuts and green onions, stirring for 2 more minutes, then pour in the sauce. Stir to coat well. Once the chicken is cooked through, remove the pan from the heat and set aside. Finally, make the peanut sauce topping. Add the sauce to a small bowl and whisk until smooth. Last, assemble the lettuce cups. Add butter lettuce leaves to a plate (double up so they are sturdy), then fill with some of the chicken mixture and add peanut sauce on top. Garnish with sesame seeds and enjoy. #proteinreci

@kalejunkie 🇲🇽✈️ Every year my sister and I take a short trip together—it’s a tradition we’ve had for years and this year we picked Mexico City and our lives are forever changed—the people, the culture, the FOOD—I will never be the same and cannot wait to come back! Here’s where we stayed and where we ate, so save this post! Stayed: @lasalcobas in Polanco. The hotel was so cute, located among all the luxury shops and the hospitality was 10/10! We had breakfast at the restaurant Anatola each morning and the steak chilaquiles was a highlight! Ate/did: @tacoslaoncemil, the only michelin star taqueria. A5 Wagyu taco was life changing! @restauranterosetta for dinner, get the cabbage tacos and filet mignon @testarudo_cafe for a coffee break @havrestudio for custom vintage blazers (a MUST!) @maximobistrot for dinner, this vibes here were on point and it’s another life changing meal! Get the chicken, it’s crispy and melts in your mouth! @panaderiarosetta for pastries and coffee/matcha (we loved the guava roll) @tacosdelvalle for more incredible tacos. Highly recommend the carne asada tacos @sohohouse for a little cocktail break @contramarmx for dinner and another life changing restaurant. Get the tuna tostadas and the split fish 🐟 I will never be the same! stylist: @reginavillanueva #cdmx #mexicocity
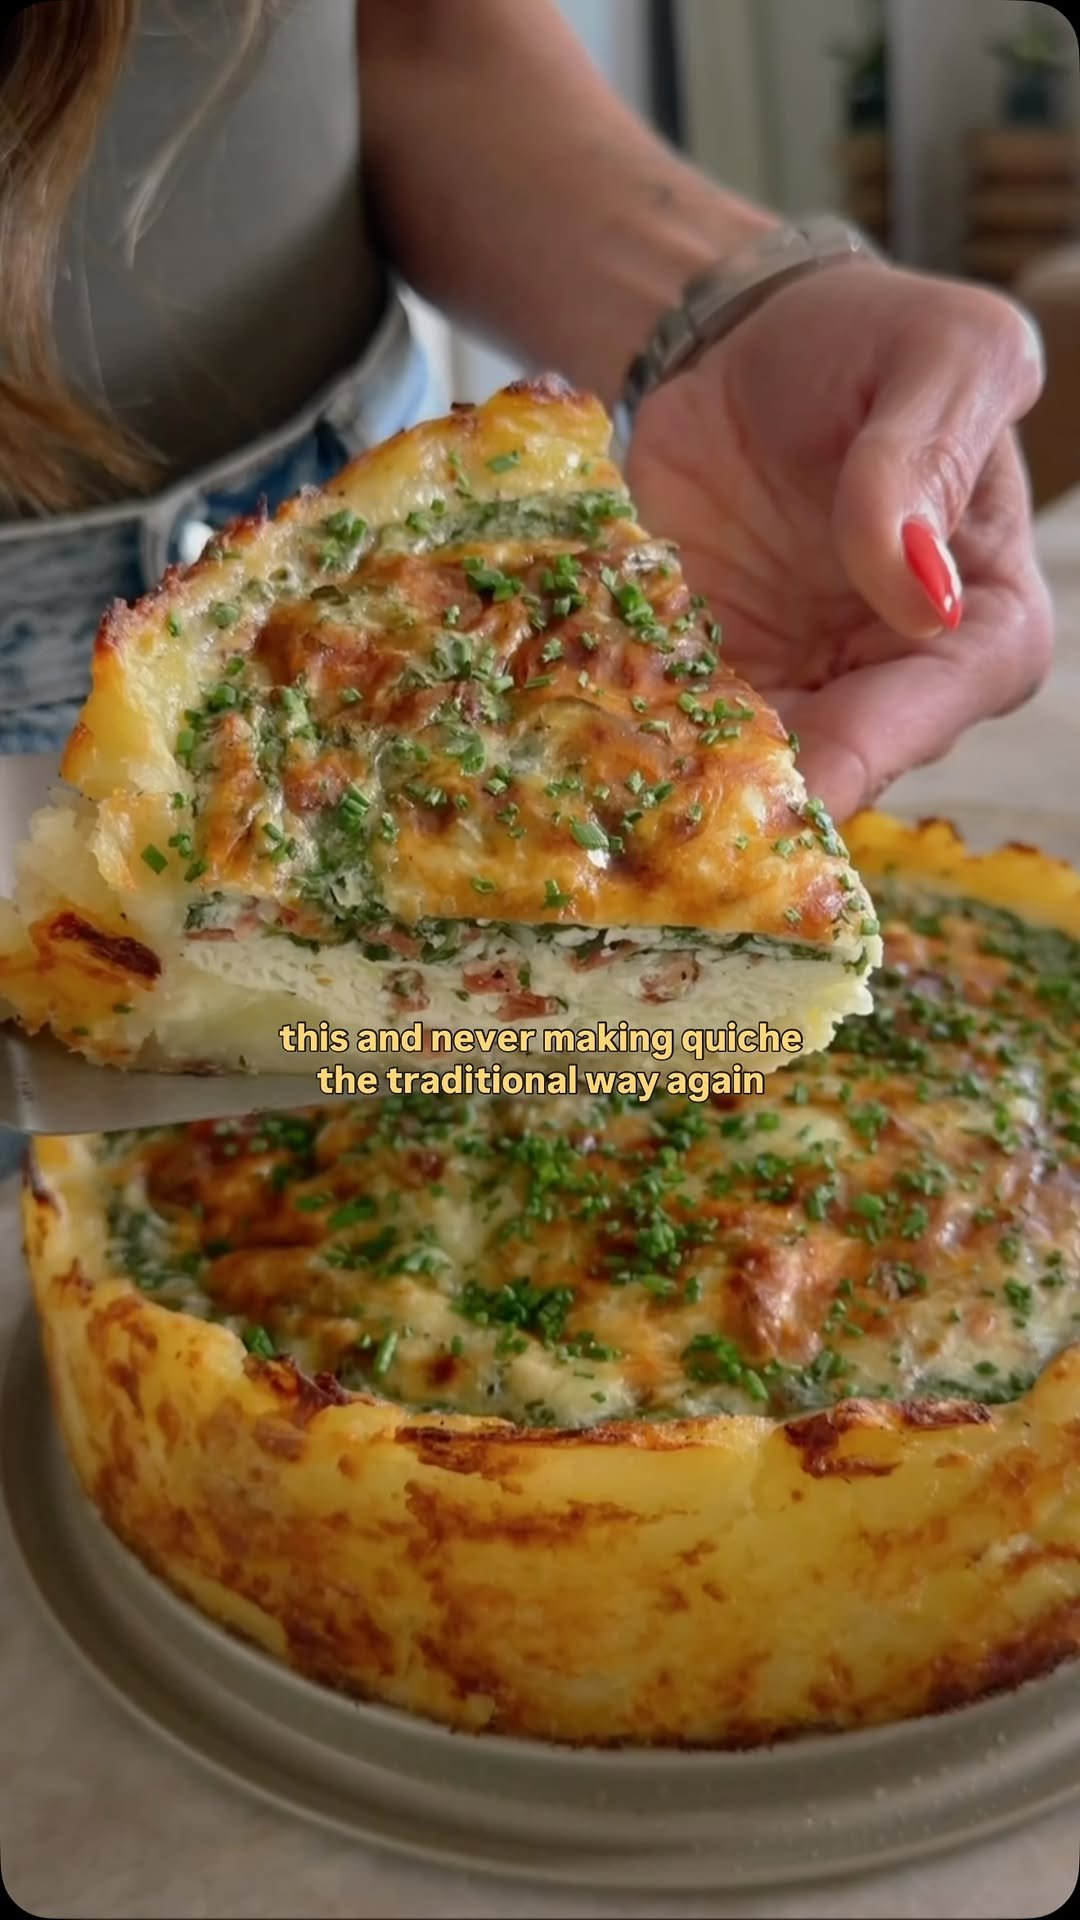
@kalejunkie HIGH PROTEIN POTATO CRUST QUICHE! I’ve seen different versions of this floating around, but mine is like a big egg white frittata, low in fat and packed with protein! i made this once and we enjoyed it for breakfast all week long! it’s so easy to make and you can customize to whatever veg and meats you have in your fridge! SAVE this post, SHARE with friends and FOLLOW me @kalejunkie for more easy, protein-forward recipes! Makes 8 servings 6-7 medium golden potatoes, halved Avocado/olive oil spray 2 cups egg whites 3/4 cup low fat cottage cheese 1 cup spinach, finely chopped 1 bunch chives, finely chopped 4 slices turkey bacon, cooked 1 tsp garlic powder Salt + pepper 3/4 cup shredded mozzarella cheese First, cut potatoes in half and then drop them into a pot of boiling water. Boil until fork tender, then let cool and peel the skins off. Spray a springform pan with the oil spray. Add the potatoes into the pan and smash into the bottom and up the sides of the pan. Spray crust again and season with s+p. Preheat oven to 425F. Bake for 25 minutes, then remove from oven. In a large bowl, mix together the filling: egg whites, cottage cheese, spinach, bacon, chives, garlic powder, s+p. Pour mixture onto the potato crust. Sprinkle with mozzarella cheese. Bake again for 40ish minutes. Remove from oven, let sit for 10-15 minutes then slice and enjoy. #viralrecipes #highproteinrecipes #potatoquiche #breakfastideas

I hate to leave the house, but I LOVE to leave the country!! #mexicocity 🇲🇽
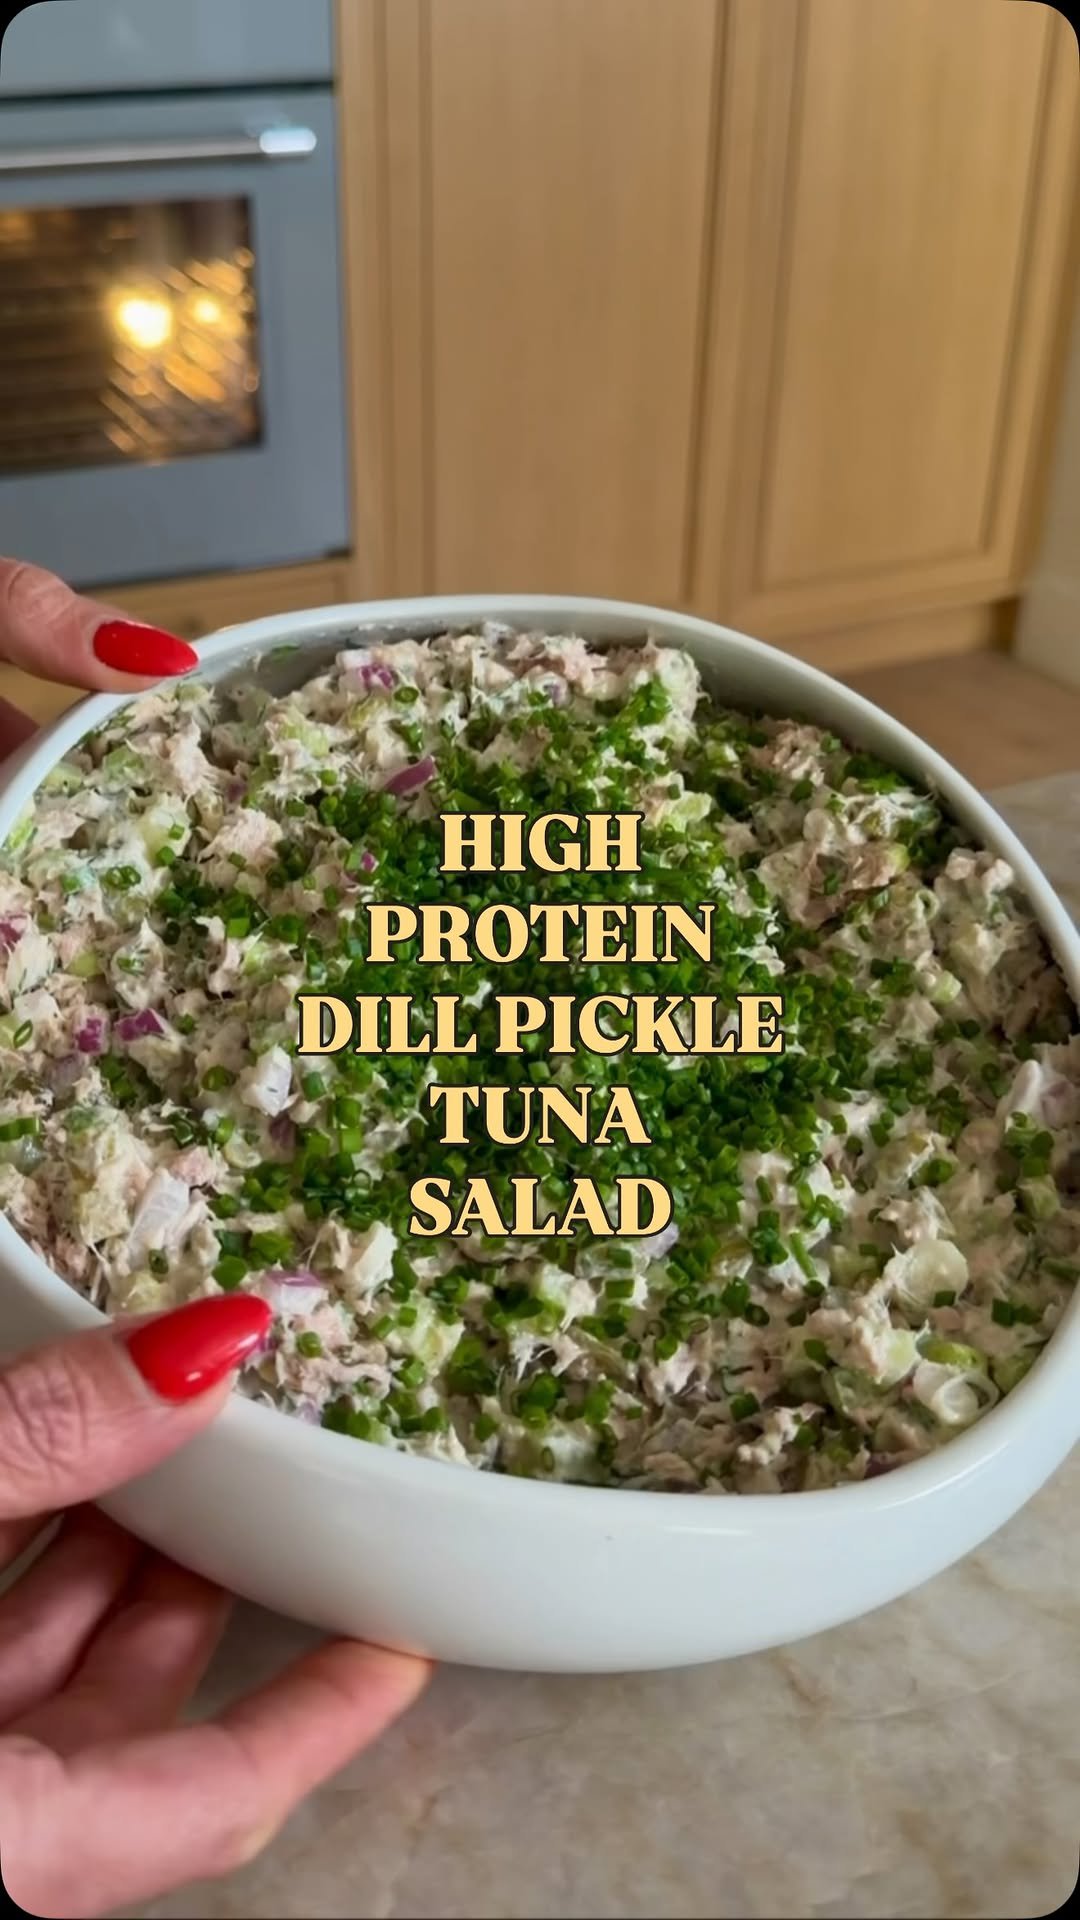
@kalejunkie HIGH PROTEIN DILL PICKLE TUNA SALAD with homemade pita chips! You know I hate mayo and that I eat the food I share, so…this recipe is mayo-free. Add it if you want! You can serve this salad with the pita chips, in a bell pepper, over romaine leaves or enjoy straight from le bowl! 🥣 MACROS: 33g protein • 9g carbs • 1 g fat SAVE this post, SHARE with friends, and be sure to FOLLOW ME @kalejunkie so you don’t miss my posts! I share easy, delicious, high protein recipes! Makes 4 servings 3 cans tuna packed in water 5 green onions, thinly sliced 1/2 cup cornichon pickles, chopped 2 stalks celery, diced 1/4 red onion, finely diced 1/4 cup fresh dill, chopped 1 bunch chives, finely chopped 1 lemon, zested and juiced 1 1/2 cups fat free greek yogurt 2 tsp dijon mustard 1 tb honey or maple syrup (optional, for a touch of sweetness) 2 tb pickle juice (from the cornichons jar) 1/2 tsp kosher salt 1 tsp ground black pepper Pita chips 2 large pita breads (I used @cutdacarb low carb pitas) 3 tb olive oil 1 tsp garlic powder 2 tsp oregano 1 tsp kosher salt Preheat oven to 400F. Cut pita into large squares and add to a bowl. Whisk together the oil and seasonings and pour over the pita pieces. Toss together coat well then spread into an even layer onto a large baking sheet. Bake for 6-7 minutes until golden brown (keep an eye on them so they don’t burn), then remove from oven to harden. Next, make the tuna salad. Add the tuna to a large bowl and mash well into tiny pieces. Add remaining ingredients and toss together coat well. Taste and adjust seasonings as needed. Use the pita chips to scoop it up and ENJOY! #tunasalad #highproteinrecipes #macrofriendly #proteinlunch #mealprep mealpreplunch mealprepideas
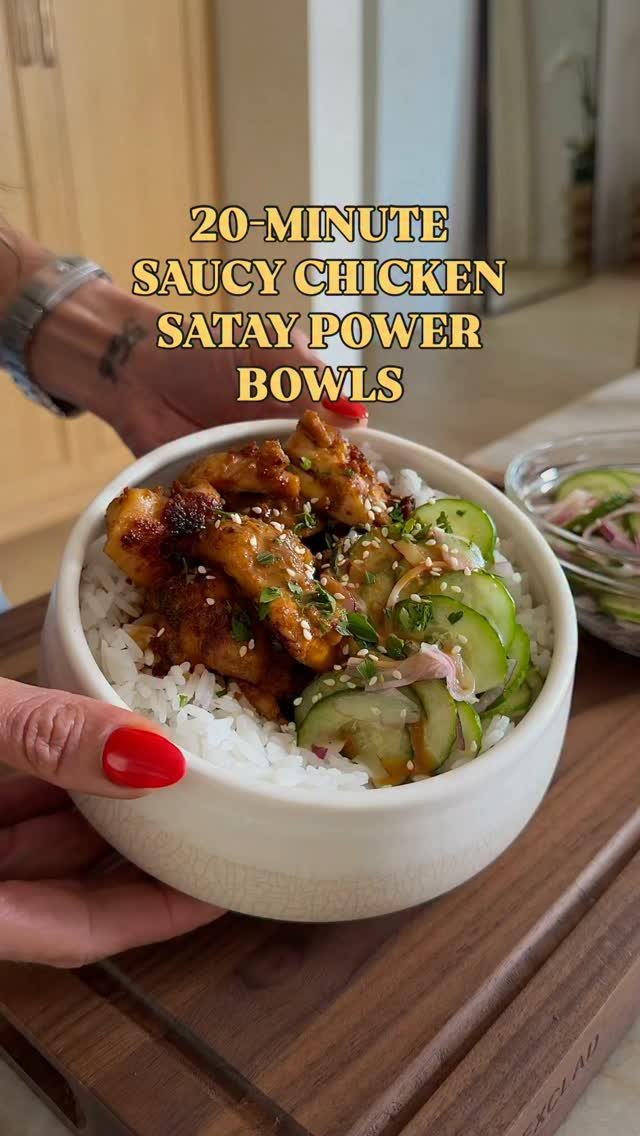
@kalejunkie 👋🏼 I’m here to help you get REALLY GOOD meals on the table QUICK! You need to make my new SAUCY CHICKEN SATAY POWER BOWLS for dinner! No, this is not authentic chicken satay, but it reminds me of it. And yes, you really can make this in 20-minutes, I promise! My shortcut is using frozen rice to save time, and you don’t need to let the chicken sit in the marinade. Just toss the chicken in the sauce and get cooking right away. ENJOY!! SAVE this post, SHARE with friends, and FOLLOW me @kalejunkie for more delicious, easy recipes that anyone can make! Makes 4 servings 1 15oz can lite coconut milk 1/4 cup dark soy sauce (or low sodium soy sauce) 2 tb red curry paste 1/2 cup creamy peanut butter 2 lbs boneless, skinless chicken thighs 2 cups cooked jasmine rice Cucumber salad 3 persian cucumbers, thinly sliced 1/4 cup red onion, thinly sliced 2 tb rice vinegar 1 tsp toasted sesame oil Optional garnishes: chopped parsley & sesame seeds In a bowl, whisk together the coconut milk, soy sauce, curry paste, and peanut butter, until smooth. Pat chicken dry and add it to a large bowl. Toss with 1/2 of the sauce and coat the chicken well. Set the remaining sauce aside to use later. Next, heat a large non-stick skillet on the stove over medium-high heat. Once the pan is hot, add the chicken and do not disturb it for 3-4 minutes, then flip to the other side and let cook another 4 minutes or so. You can now flip the chicken a few times. Remove from the heat once the chicken is cooked through (165F) and set aside. Next, make the cucumber salad. Add the salad ingredients to a bowl and toss well. Finally, plate your meal. Divide rice between the bowls, add the cooked chicken and cucumber salad. Drizzle remaining sauce on top and enjoy! #proteinrecipes #easydinner #mealprepdinner