인기 검색 계정


킴_과장(@kim__gwajang) 인스타그램 상세 프로필 분석: 팔로워 88,632, 참여율 13.19%

@kim__gwajang
킴_과장
🇰🇷 한국 음식 레시피 모음 ⏱ 13초 안에 끝내는 초간단 요리 📌 매일 올라오는 짧은 영상 🎥ZV-E10 촬영👍
https://link.inpock.co.kr/kim_gwajang@kim__gwajang님과 연관된 프로필


@kim__gwajang 계정 통계 차트
게시물 타입 분포
시간대별 활동 분석 (최근 게시물 기준)
@kim__gwajang 최근 게시물 상세 분석
동영상 게시물 분석
@kim__gwajang 최근 게시물

짧은 영상이니 레시피 확인 부탁드립니다! 재료 -스팸 200g -라이스페이퍼 12장 -참깨 2스푼 -식용유 소스 재료 -불닭소스 1스푼 -마요네즈 3스푼 -머스타드 소스 1스푼 -후추 만드는 방법 1. 스팸을 썰어주세요. 2. 라이스페이퍼를 반으로 잘라주세요. 3. 스팸을 라이스페이퍼로 두번 말아주세요. 4. 3등분을 썰어서 참깨에 버무려주세요. 5. 식용유 뿌려서 에프에 180도 10분 돌려주세요 6. 미친 소스 찍어 먹으면 완성입니다! 겉은 바삭, 속은 촉촉한 식감의 스팸 팝콘 만들었어요! 고소한 참깨가 톡톡 터지며 입안을 감싸고, 짭조름한 스팸과 쫄깃한 라이스페이퍼가 환상의 조화를 이루더라고요. 에어프라이어로 구워내 기름지지 않고 담백하면서도 바삭한 식감이 살아 있어요. 한입 베어 물면 겉은 크런치하고 속은 촉촉하게 씹히는 맛의 균형이 예술입니다. 거기에 미친 소스를 찍어 먹는 순간, 단짠과 감칠맛이 폭발하며 입맛을 확 사로잡더라고요. 맥주 안주로 완전 딱이에요!! 집에 스팸이랑 라이스페이퍼 있으시면 꼭 한번 만들어서 드셔보세요! Ingredients -200g Spam -12 sheets of rice paper -2 tbsp sesame seeds -Cooking oil spray Sauce Ingredients -1 tbsp Buldak (spicy chicken) sauce -3 tbsp mayonnaise -1 tbsp mustard -A dash of black pepper Instructions 1. Slice the spam. 2. Cut the rice paper in half. 3. Wrap each piece of spam twice with rice paper. 4. Cut into thirds and coat with sesame seeds. 5. Spray with oil and air-fry at 180°C (356°F) for 10 minutes. 6. Dip into the crazy sauce — and enjoy! Crispy on the outside, juicy on the inside — we made Spam Popcorn! The nutty sesame seeds pop in your mouth, wrapping around the salty spam and chewy rice paper in perfect harmony. Since it’s air-fried, it‘s not greasy at all but still incredibly crispy. One bite gives you a crunchy shell and moist center — the balance is unreal. And when you dip it in the ”crazy sauce,“ that sweet, spicy, and creamy combo explodes with flavor. It’s dangerously addictive and absolutely perfect with a cold beer. If you have Spam and rice paper at home, you have to try this!
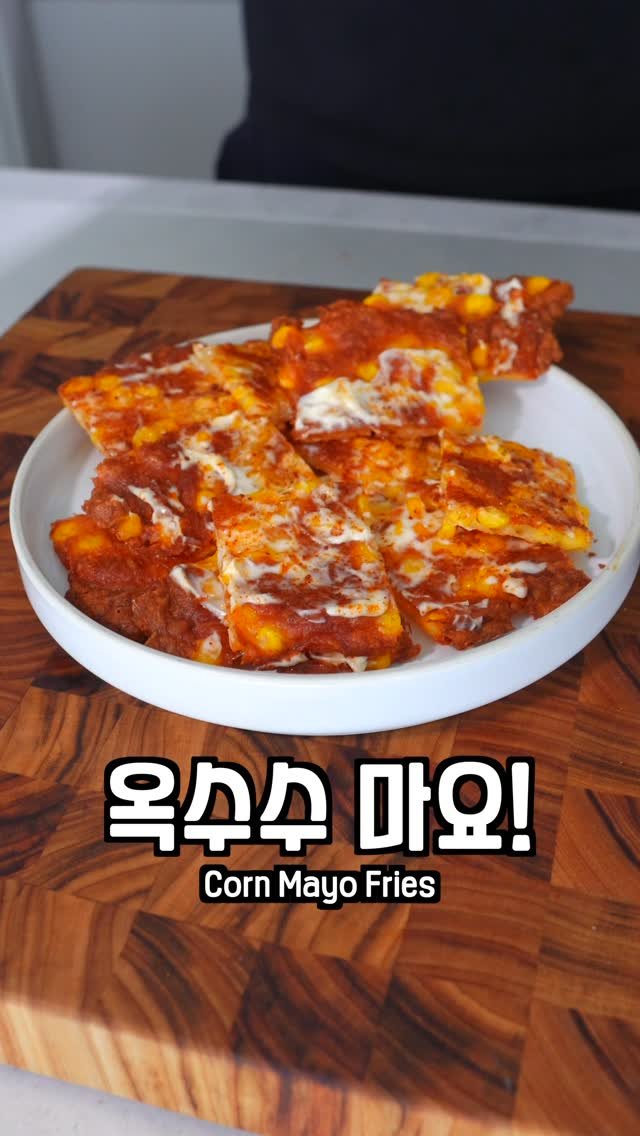
짧은 영상이니 레시피 확인 부탁드립니다! 재료 -스위트콘 1/2캔 -모짜렐라치즈 -라면스프 1/2 -마요네즈 3스푼 만드는 방법 1. 스위트콘 키친타월로 물기 제거해주세요. 2. 치즈 위에 옥수수 올려주세요. 3. 에어프라이어에 180도 15분 돌려주세요. 4. 마요네즈, 라면스프 뿌려주세요. 5. 한입 크기로 잘라주면 완성입니다! 스위트콘을 치즈 위에 올려서 에어프라이어에 돌리면 달콤한 향이 먼저 퍼져요. 겉은 바삭하게 구워지고 속은 촉촉하게 살아 있어서 한입 베어 물 때마다 재미있는 식감을 느낄 수 있어요. 치즈는 노릇하게 녹아내리며 고소한 풍미를 더해 주고, 옥수수의 달달함을 감싸 안아 더 풍부한 맛을 만들어 줘요. 여기에 마요네즈가 부드럽게 스며들면서 전체적인 맛의 균형을 잡아 주고, 라면스프가 마지막에 솔솔 뿌려지면 짭조름한 감칠맛이 폭발해요. 단짠 조합이 어울려서 자꾸만 손이 가는 매력이 있어요. 잘라서 한입 크기로 먹다 보면 치즈와 옥수수, 마요와 스프가 한데 어우러져 “와, 이건 진짜 존맛이네요”라는 감탄이 절로 나와요. 맥주없이 먹기에는 너무 아쉬워요. 집에 스위트콘 있으면 꼭 한번 만들어서 드셔보세요! Ingredients -1/2 can of sweet corn -Mozzarella cheese -1/2 packet of ramen seasoning -3 tbsp mayonnaise Instructions 1. Pat the sweet corn dry with a paper towel. 2. Place the corn on top of the cheese. 3. Air-fry at 180°C (356°F) for 15 minutes. 4. Sprinkle with mayonnaise and ramen seasoning. 5. Cut into bite-sized pieces — and it’s ready! When you put sweet corn on cheese and air-fry it, a sweet aroma fills the air. The outside turns crispy while the inside stays moist, giving every bite a fun texture. The cheese melts to a golden finish, adding richness and wrapping around the sweetness of the corn. The mayonnaise blends in smoothly, balancing the flavors, and the ramen seasoning on top delivers that irresistible salty kick. The sweet-and-savory combo makes it so addictive you can’t stop eating. Cut into bite-sized pieces, each mouthful bursts with cheesy, corny, creamy, and savory goodness — you’ll find yourself saying, “Wow, this is seriously delicious!” Honestly, it feels incomplete without a cold beer. If you have some sweet corn at home, you’ve got to try this!

짧은 영상이니 레시피 확인 부탁드립니다! 재료 -도리토스 -모짜렐라치즈 60g(라면에 넣어먹는 치즈 2팩) -편의점 소세지 -토마토 소스 만드는 방법 1. 소세지에 나무꼬치 빼주고 썰어주세요. 2. 도리토스 준비해서 도리토스 위에 토마토 소스, 치즈, 소세지 올려주세요 3. 에어프라이어에 200도 5분 돌려주면 완성입니다! Doritos 위에 토마토 소스랑 치즈, 소세지를 올려서 에프에 딱 돌리면요, 피자집에서 갓 구워낸 한 판이 생각날 만큼 향이 퍼져요. 바삭하게 구워진 도리토스는 일반 피자 도우보다 훨씬 강렬한 크런치를 주고요, 한 입 베어 물면 도리토스 고소한 맛이 먼저 터져요. 그 위에 토마토 소스가 새콤달콤하게 퍼지면서 치즈랑 만나 녹아내리는 순간, 진한 풍미가 입안을 감싸줘요. 치즈가 사르르 녹아 소세지를 감싸줄 때, 짭짤하고 육즙 가득한 맛이 함께 퍼져서 조화가 정말 끝내줘요. 씹을 때마다 바삭함과 촉촉함이 동시에 느껴져서 기분 좋은 반전이 있어요. 편의점 재료로 만들었는데 이렇게 풍부한 맛을 낼 수 있다는 게 놀라워요. 피자의 푸짐함과 과자의 중독성이 함께 살아 있어서 술안주로도, 간식으로도 딱 좋아요. 단 5분이면 완성되는 이 조합은 편의점 레시피의 진수라고 할 수 있고요, 먹는 순간 누구나 좋아할 맛이에요! 꼭 한번 만들어서 드셔보세요! Ingredients -Doritos -Mozzarella cheese 60g (2 packs of cheese usually used for ramen) -Convenience store sausage -Tomato sauce How to Make 1. Remove the wooden skewer from the sausage and slice it. 2. Prepare Doritos, then top them with tomato sauce, cheese, and sausage. 3. Air fry at 200°C (392°F) for 5 minutes, and it’s ready! When you put tomato sauce, cheese, and sausage on Doritos and pop them in the air fryer, the aroma is just like a fresh pizza out of the oven. The Doritos become extra crunchy, even more than regular pizza dough, and the first bite bursts with a nutty corn flavor. Then the tomato sauce spreads with a sweet and tangy kick, blending perfectly with the melted cheese. As the cheese melts over the sausage, the savory, juicy flavor fills your mouth for an amazing balance. Every bite is both crispy and soft at the same time, giving you a fun contrast in texture. It’s surprising how rich and satisfying this tastes with just simple convenience store ingredients. The hearty pizza vibe mixed with the addictive crunch of chips makes it perfect as a snack or even as a quick drinking side. It only takes 5 minutes, but this recipe really shows the best of convenience store cooking, and once you try it, you’ll definitely want more. Give it a try!
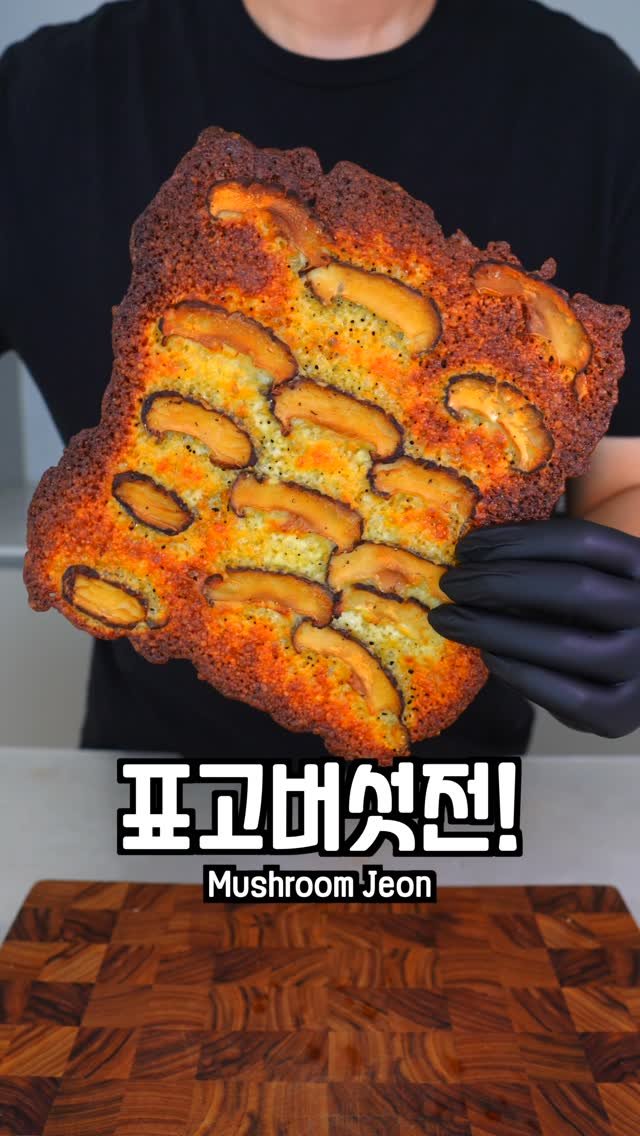
짧은 영상이니 레시피 확인 부탁드립니다! 재료 -표고버섯 -모짜렐라치즈 80g -올리브유 2스푼 -소금 -후추 만드는 방법 1. 표고버섯을 썰어주세요. 2. 올리브유 소금 후추 넣고 섞어주세요. 3. 트레이위에 치즈, 표고버섯 썰어둔 표고버섯 올려주세요. 4. 에어프라이어에 180도 10분 돌려주고 한입 크기로 썰어주면 완성입니다! 신선한 표고버섯을 먹기 좋은 크기로 썰어 올리브유와 소금, 후추를 더해 고소하면서도 은은한 감칠맛을 끌어내는 게 포인트예요. 에어프라이어에 180도로 10분 정도 돌리면 표고버섯의 수분이 적당히 날아가면서 식감이 쫄깃하고 깊은 향이 살아나요. 치즈는 고소하게 녹아내리며 겉은 살짝 노릇해져 더욱 식욕을 자극하지요. 완성된 요리를 한입 크기로 썰어내면 부담 없이 즐기기 좋아 간단한 안주나 간식으로도 훌륭해요. 버섯 본연의 향과 치즈의 진한 맛이 균형 있게 어우러져 남녀노소 누구나 맛있게 즐길 수 있는 레시피예요. 무엇보다 재료가 단순하고 조리법이 쉬워 요리 초보자도 부담 없이 따라 할 수 있는 점이 매력이에요. 건강하면서도 깊은 풍미를 느낄 수 있는 버섯 요리를 찾는 분들에게 꼭 추천하고 싶은 메뉴예요!! 추석에 간단하게 안주로 꼭 드셔보세요! Ingredients -Shiitake mushrooms -Mozzarella cheese 80g -Olive oil 2 tbsp -Salt -Black pepper Instructions 1. Slice the shiitake mushrooms. 2. Add olive oil, salt, and black pepper, then mix well. 3. On a tray, place mozzarella cheese and the sliced shiitake mushrooms. 4. Air fry at 180°C (355°F) for 10 minutes, then cut into bite-sized pieces — and it’s ready! Fresh shiitake mushrooms are sliced and mixed with olive oil, salt, and pepper to bring out a rich, savory flavor. Air frying at 180°C for about 10 minutes gives the mushrooms a chewy texture while enhancing their deep aroma. The cheese melts smoothly and turns golden on the edges, making it even more appetizing. Once cut into bite-sized pieces, it’s easy to enjoy as a snack or side dish. The balance of earthy mushroom flavor and rich cheese makes this dish a hit for everyone. With only a few ingredients and such a simple process, even beginners can cook it with ease. A healthy yet flavorful mushroom dish you’ll want to try! 🍄✨ Perfect as a quick appetizer for Chuseok or any gathering!

짧은 영상이니 레시피 확인 부탁드립니다! 재료 -감자 500g -버터 40g -꿀 2스푼 -파슬리 -식용유 만드는 방법 1. 감자 껍질까주세요. 2. 채칼로 손이 비칠만큼 얇게 썰어주세요. 3. 물기 제거해서 식용유 뿌려주고 전자렌지 1분씩 5번 돌려주세요. 4. 버터, 꿀, 파슬리 섞어주고 감자에 버무려주면 완성입니다! 오늘은 집에서 만들어서 먹는 허니버터 감자칩 만들었어요! 허니버터칩은 단짠의 조화를 극대화한 매력적인 간식이에요. 얇게 썰린 감자는 전자레인지에서 바삭하게 구워져 기름에 튀기지 않아도 담백한 바삭함을 자랑해요. 여기에 녹인 버터의 고소함과 꿀의 은은한 달콤함이 어우러지면서 풍미가 한층 깊어져요. 한입 베어 물면 처음에는 바삭한 소리와 함께 고소한 버터향이 퍼지고, 이어서 꿀의 부드럽고 달콤한 맛이 감자 본연의 짭짤한 맛과 어울려 입안을 가득 채워요. 씹을수록 감자의 고소함과 꿀버터의 진한 풍미가 겹겹이 밀려와 계속 손이 가는 중독성을 선사해요. 집에 감자 남아있으면 꼭 한번 만들어서 드셔보세요! Ingredients -500g potato -40g butter -2 tbsp honey -Parsley -Cooking oil How to make 1. Peel the potatoes. 2. Slice thinly with a slicer until almost transparent. 3. Remove moisture, spray with cooking oil, and microwave for 1 minute × 5 times. 4. Mix butter, honey, and parsley, then toss with the potatoes — done! Today I made homemade honey butter potato chips! Honey butter chips are an addictive snack that maximizes the harmony of sweet and savory. The thinly sliced potatoes are crisped up in the microwave, giving them a light crunch without deep-frying. The nutty richness of melted butter blends with the gentle sweetness of honey, creating a deeper flavor. With the first bite, you hear the crunch and taste the buttery aroma, followed by the sweet honey that balances perfectly with the natural savoriness of potatoes. The more you chew, the more layers of flavor unfold, making them irresistibly addictive. If you have potatoes at home, you should definitely give this a try!
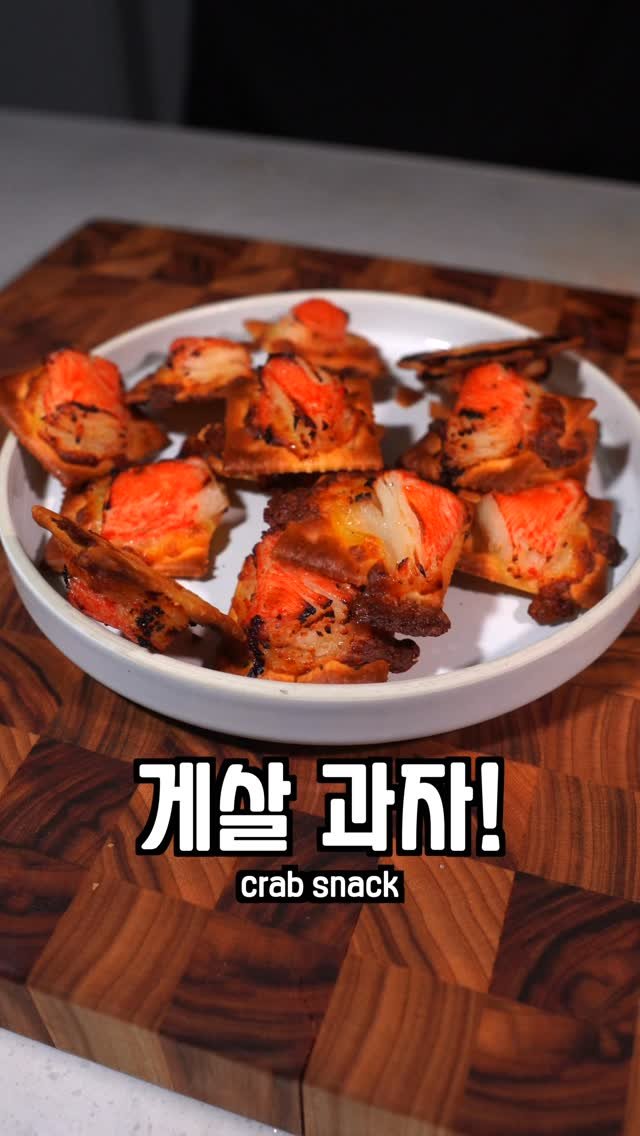
짧은 영상이니 레시피 확인 부탁드립니다! 재료 -크래미 8개 -참크래커 -모짜렐라치즈 60g -버터 20g -설탕 1스푼 -다진마늘 1/2스푼 만드는 방법 1. 크래미를 반으로 썰어주세요. 2. 전자렌지에 녹인 버터, 설탕, 다진마늘 크래미 넣고 섞어주세요. 3. 크래커 위에 치즈, 크래미 올려주세요. 4. 에어프라이어에 200도 10분 돌려주면 완성입니다! 오늘은 돌아온 편의점 재료 레시피에요! 반으로 썬 크래미가 버터 소스와 만나 촉촉하면서도 짭짤한 감칠맛을 내고, 치즈가 녹아내리며 크래커와 어우러져 바삭함과 부드러움이 동시에 느껴져요. 한 입 베어 물면 크래커의 바삭한 식감이 먼저 전해지고, 뒤이어 치즈의 고소함과 크래미의 담백함이 조화를 이루며 마치 고급 레스토랑에서 맛볼 법한 풍성한 맛을 선사해요. 특히 마늘의 향이 은은하게 퍼져 느끼함을 잡아주고, 단짠단짠한 균형이 입맛을 자극해 자꾸만 손이 가는 마성의 간식이 완성돼요. 에어프라이어에서 갓 구워져 나온 따끈한 크래미 스낵은 냄새만으로도 군침을 돌게 하고, 편의점 재료만으로 이런 훌륭한 조합을 즐길 수 있다는 점이 최고에요! 크래미 구매해서 꼭 한번 만들어서 드셔보세요! Ingredients -8 crab sticks (surimi) -Crackers -60g mozzarella cheese -20g butter -1 tbsp sugar -1/2 tbsp minced garlic Instructions 1. Cut the crab sticks in half. 2. Mix melted butter, sugar, minced garlic, and the crab sticks together. 3. Place cheese and crab sticks on top of the crackers. 4. Air-fry at 200°C (390°F) for 10 minutes. Today’s recipe is made with simple convenience store ingredients! The crab sticks, sliced in half, soak up the buttery sauce, turning juicy and savory. The melted cheese blends perfectly with the crackers, bringing both crispiness and creaminess in every bite. At first, you get the crunchy cracker, then the rich cheese and the tender crab stick create a flavor that feels like something from a fine restaurant. The garlic aroma adds depth and keeps the flavor balanced with that addictive sweet-and-salty kick. Fresh out of the air fryer, these warm crab snacks smell irresistible and taste even better. It’s amazing that you can enjoy such a delicious combo with just convenience store ingredients! Definitely give this recipe a try when you pick up some crab sticks!
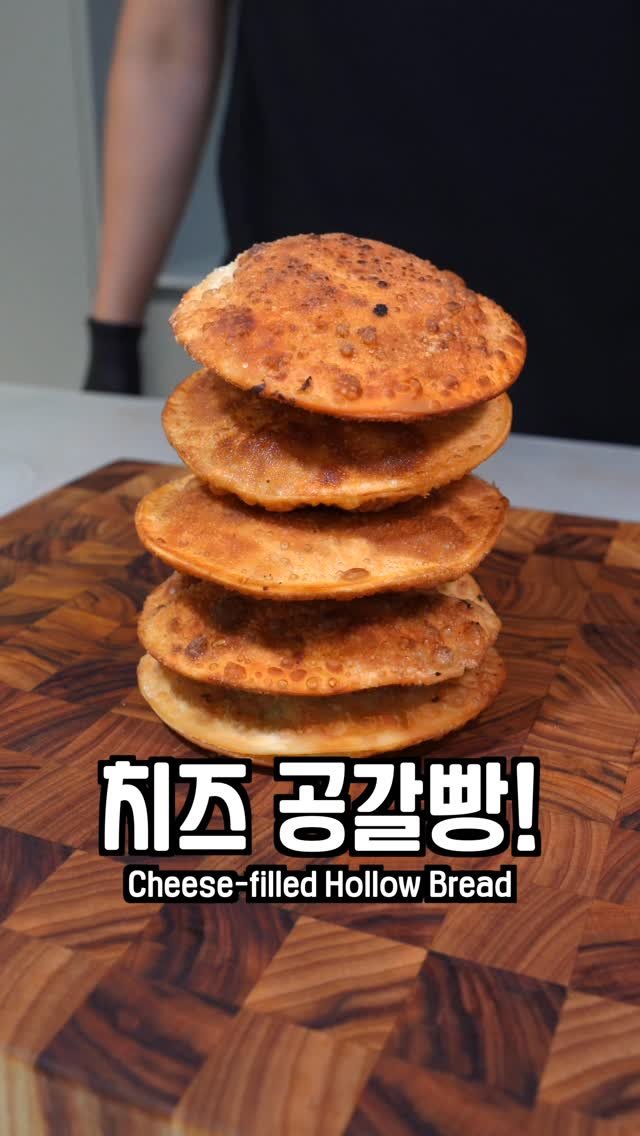
짧은 영상이니 레시피 확인 부탁드립니다! 재료 -만두피 -설탕 2스푼 -라면스프 - 모짜렐라치즈 60g -식용유 만드는 방법 1. 설탕, 라면스프 , 치즈 넣고 섞어주세요. 2. 만두피 위에 재료 올리고 물발라서 다시 덮어주세요. 3. 불세기 강불에 부풀어 오를때 까지 튀겨주면 완성입니다! 바삭하게 튀겨낸 만두피를 한입 베어 물면 먼저 고소한 치즈의 풍미가 진하게 퍼지면서 입안을 가득 채워주고, 이어서 라면스프 특유의 짭짤하고 중독적인 맛이 치즈와 어우러져 마치 치즈라면을 바삭한 과자로 즐기는 듯한 색다른 경험을 선사해요. 설탕이 은은하게 뒤를 받쳐주면서 단짠단짠의 조화가 살아나고, 튀겨낸 만두피는 속이 공갈빵처럼 부풀어 올라 바삭하면서도 속은 가볍게 비어 있어 한층 더 경쾌한 식감을 느낄 수 있어요. 치즈가 뜨겁게 녹아 흘러내리며 짭조름한 맛을 감싸고, 설탕의 단맛이 살짝 스며들어 자꾸 손이 가는 매력을 만들어내요. 라면스프가 주는 깊은 감칠맛 덕분에 단순히 간식이 아니라 중독적인 별미로 다가오고, 바삭한 소리와 함께 입안에서 어우러지는 조합이 매우 특별하게 다가와요. 집에 만두피 있으면 꼭 한번 만들어서 드셔보세요! Ingredients -Dumpling wrappers -2 tablespoons sugar -Ramen seasoning powder -60g mozzarella cheese -Cooking oil Instructions 1. Mix together the sugar, ramen seasoning, and cheese. 2. Place the mixture on top of a dumpling wrapper, brush the edges with water, and cover with another wrapper. 3. Deep-fry over high heat until it puffs up — then it’s ready! When you take a bite of the crispy fried dumpling wrapper, the rich flavor of melted cheese fills your mouth first. Then, the salty and addictive taste of ramen seasoning blends with the cheese, creating a unique experience that feels like enjoying cheesy ramen in the form of a crunchy snack. The sugar gently balances it all out, bringing a sweet-and-savory harmony, while the puffed wrapper turns airy and crisp, giving it a light and satisfying texture. The hot, gooey cheese wraps around the savory notes, and the touch of sweetness keeps you reaching for more. Thanks to the deep umami from the ramen seasoning, this isn’t just a snack but a truly addictive treat. The crunch pairs perfectly with the flavor mix, making it extra special. If you have dumpling wrappers at home, you should definitely give this a try!
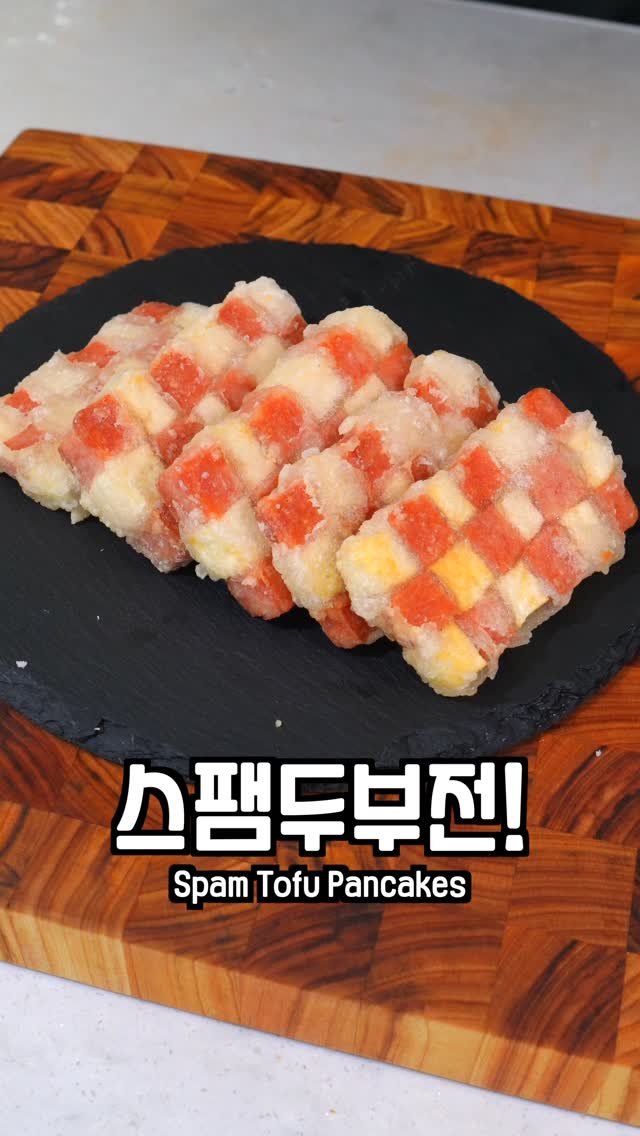
짧은 영상이니 레시피 확인 부탁드립니다! 재료 -스팸 -두부 -전분가루 -식용유 만드는 방법 1. 스팸 준비해서 두부랑 사이즈 맞게 썰어주세요. 2. 스팸과 두부를 9등분으로 썰어주세요. 3. 두부에 소금 뿌려서 물기 빼주세요. 4. 두부, 스팸, 두부 전분 뿌려주고 반대로 반복해서 쌓아주고 썰어주세요. 5. 스팸 두부를 기름에 튀기듯 구워주면 완성입니다! 스팸두부전은 바삭함과 부드러움이 절묘하게 어우러진 특별한 별미예요. 고소하게 구워낸 두부의 담백한 맛 사이로 짭조름한 스팸이 끼어들며 풍성한 풍미를 만들어내요. 전분을 살짝 입혀 겉은 노릇하게, 속은 촉촉하게 완성되어 씹을 때마다 바삭한 식감과 부드러운 속살이 함께 느껴져요. 두부가 주는 담백함 덕분에 스팸의 짠맛이 과하지 않고, 오히려 균형 있게 어울려 누구나 부담 없이 즐길 수 있어요. 한입 크기로 잘라내어 입에 넣으면 겉은 바삭, 속은 촉촉하면서 짭조름한 풍미가 퍼져 밥반찬으로도 훌륭하고 술안주로도 제격이에요. 스팸이랑 두부 구매해서 꼭 한번 만들어서 드셔보세요! Ingredients -Spam -Tofu -Starch (cornstarch or potato starch) -Cooking oil Instructions 1. Prepare the Spam and slice it to match the size of the tofu. 2. Cut both the Spam and tofu into 9 equal pieces. 3. Sprinkle salt on the tofu and remove excess moisture. 4. Stack tofu, Spam, and tofu with a light coating of starch, repeat the layers, then slice into bite-sized pieces. 5. Pan-fry in oil until golden and crispy, almost like deep-frying, and it’s ready! Spam Tofu Pancakes are a special treat where crispiness and softness come together perfectly. The mild, nutty flavor of golden-fried tofu pairs beautifully with the savory, salty taste of Spam, creating a rich and balanced bite. A thin starch coating makes the outside crispy while keeping the inside moist and tender, giving you both crunch and softness in every bite. Thanks to the tofu, the Spam’s saltiness isn’t overpowering, making it light and easy to enjoy. Cut into bite-sized pieces, each mouthful delivers a crispy exterior with a juicy, savory center—perfect as a side dish with rice or even as a snack with drinks. With just a few simple ingredients, you get a dish that’s anything but simple in flavor. Be sure to grab some Spam and tofu and give this recipe a try!

짧은 영상이니 레시피 확인 부탁드립니다! 재료 -스위트콘 -라이스페이퍼 -설탕 1스푼 -라면스프 만드는 방법 1. 스위트콘 준비하고 라이스페이퍼위에 옥수수 올려서 접어주세요. 2. 3등분으로 썰어주고 식용유 뿌려주세요. 3. 에어프라이어에 200도 10분 돌려주세요. 4.설탕 남아있는 라면스프 뿌려주면 완성입니다! 집에서 만든는 바삭하면서도 고소한 식감이 매력적인 간식 레시피를 소개해드릴게요. 달콤한 스위트콘을 준비해 라이스페이퍼 위에 올려 접어주면 옥수수의 촉촉한 단맛이 라이스페이퍼의 쫄깃함과 만나 색다른 조화를 이루어요. 이렇게 접은 라이스페이퍼를 세 등분으로 나누어 한 입 크기로 만들어주면 먹기도 편하고 모양도 귀엽게 완성돼요. 겉면에 식용유를 고르게 뿌려 에어프라이어에 200도에서 10분간 돌리면 겉은 바삭하고 속은 촉촉한 매력이 살아나요. 마지막으로 설탕과 남아있는 라면스프를 솔솔 뿌려주면 달콤짭짤한 풍미가 더해져 중독성 있는 맛을 완성할 수 있어요. 한입 베어 물면 고소한 옥수수 향과 라이스페이퍼의 바삭한 식감, 라면스프 특유의 짭짤달콤한 조화가 어우러져 계속 손이 가는 마성의 간식이 돼요. 마요네즈 찍어먹으면 정말 맛있어요!! 꼭 한번 만들어서 드셔보세요! Ingredients -Sweet corn -Rice paper -1 spoon of sugar -Ramen seasoning How to make 1. Prepare the sweet corn and place it on the rice paper, then fold it up. 2. Cut into three pieces and spray with cooking oil. 3. Air-fry at 200°C (390°F) for 10 minutes. 4. Sprinkle the leftover ramen seasoning mixed with sugar, and it’s done! Here’s a simple homemade snack that’s crispy, nutty, and super addictive. The sweet, juicy corn wrapped in chewy rice paper creates a fun texture and unique flavor. Cutting it into bite-sized pieces makes it not only easy to eat but also visually appealing. After air-frying, you’ll get a crispy outside with a moist and flavorful inside. Finally, sprinkle on the sugar and ramen seasoning for that sweet-and-savory kick that keeps you coming back for more. Take a bite, and you’ll taste the rich corn flavor, the crunch of the rice paper, and the irresistible balance of sweet and salty from the ramen seasoning. For an extra treat, dip it in mayonnaise—it tastes amazing! Definitely give it a try at home!
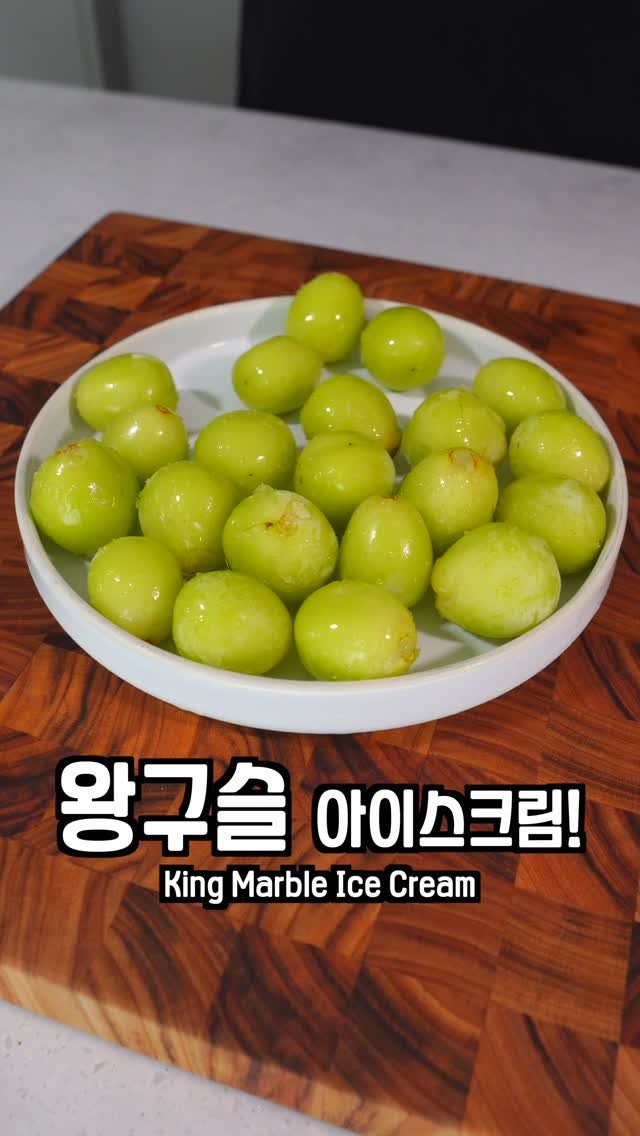
짧은 영상이니 레시피 확인 부탁드립니다! 재료 -샤인머스켓 -레몬즙 2스푼 -설탕 2스푼 만드는 방법 1. 샤인머스켓을 한 알씩 뜯어주고 물넣고 씻어주세요. 2. 탈수기에 넣고 물기 뺴주세요. 3. 레몬즙 설탕 넣고 섞어주세요. 4. 트레위에 올려서 냉동실에 6시간 얼려주면 완성입니다! 샤인머스켓 왕구슬 아이스크림은 달콤하고 상큼한 맛이 입안 가득 퍼지는 특별한 디저트예요. 한 알 한 알 알차게 뜯은 샤인머스켓은 본래의 신선한 과즙이 살아 있어서 씻어낸 후에도 싱그러운 향이 느껴져요. 레몬즙을 더하면 은은한 산미가 더해져서 단맛과 균형을 이루고, 설탕이 과육에 스며들어 자연스러운 단맛이 더욱 진하게 표현돼요. 얼려낸 뒤 한 입 베어 물면 겉은 시원하게 얼어 있지만 속은 과즙이 차오르듯 탱글탱글해요. 마치 포도 아이스크림과 샤베트의 중간 같은 식감이어서 씹는 재미가 있고, 입안에서 천천히 녹아내리면서 과일 특유의 향긋함과 청량감이 오래 남아요. 기분 좋게 즐길 수 있는 간식으로 손색없고, 아이들과 함께 만들어도 좋은 건강한 아이스크림이에요. 무엇보다 인공적인 맛이 아니라 과일 본연의 맛을 그대로 살린 점이 매력적이어서 누구나 부담 없이 즐길 수 있는 레시피예요. 요즘 마트에 샤인머스켓 많이 나오는데 구매해서 꼭 한번 만들어서 드셔보세요! Ingredients -Shine Muscat grapes -2 tbsp lemon juice -2 tbsp sugar How to Make 1. Remove the Shine Muscat grapes from the stems and rinse them with water. 2. Place them in a salad spinner to remove excess water. 3. Add lemon juice and sugar, then mix well. 4. Spread the grapes on a tray and freeze for 6 hours. Done! Shine Muscat King Marble Ice Cream is a special dessert filled with refreshing sweetness and tang. Each grape is plump and juicy, keeping its fresh aroma even after washing. The lemon juice adds a gentle tartness that balances the sweetness, while the sugar enhances the natural flavor of the fruit. Once frozen, the outside is icy and crisp, but the inside stays juicy and bouncy. It’s like a cross between grape ice cream and sorbet, fun to bite into and refreshing as it melts in your mouth. It’s the perfect summer snack, great to enjoy with kids, and much healthier than artificial sweets. The best part is that it highlights the fruit’s natural taste, so anyone can enjoy it without feeling heavy. Shine Muscat grapes are in season now, so pick some up at the market and try this recipe at home!

짧은 영상이니 레시피 확인 부탁드립니다! 재료 -페스츄리생지 3장 -소세지 3개 -계란 1개 만드는 방법 1. 소세지를 반으로 썰어주세요. 2. 패스츄리시트도 반으로 썰어주세요. 3. 소세지 말아주고 칼집 넣어서 노른자 발라주세요. 4. 에어프라이어에 180도 15분 돌려주면 완성입니다! ✅쿠팡 또는 네이버스토어에 ‘페스츄리시트’ 검색하시면 제품 구매 가능하세요❤️ ✅사용된 소세지는 인스타그램 프로필 판매 링크에 있어요❤️ 오늘은 정말 간단한 재료로 집에서 만드는 소세지빵 만들었어요!! 겉은 바삭하게 구워진 패스츄리의 결이 한입 베어 무는 순간 고소하게 부서지며 입안을 가득 채워요. 노릇노릇하게 구워진 표면은 은은한 버터 향을 풍기고, 안에 감싸진 소세지는 육즙이 살아 있어 짭조름하면서도 담백한 맛을 더해줘요. 바삭한 패스츄리와 촉촉한 소세지가 어우러져 달콤하지 않은 디저트 같은 느낌을 주면서도 든든한 간식으로 손색이 없어요. 간단하게 만들 수 있지만 고급스러운 맛을 내어, 아침 식사로도 좋고 손님 접대용 간식으로도 충분히 빛을 발하는 매력적인 메뉴예요. 재료 구매하셔서 꼭 한번 만들어서 드셔보세요! Ingredients -3 puff pastry sheets -3 sausages -1 egg Instructions 1. Cut the sausages in half. 2. Cut the puff pastry sheets in half as well. 3. Wrap the sausages with the pastry, make shallow cuts on top, and brush with egg yolk. 4. Air-fry at 180°C (356°F) for 15 minutes — and it’s done! Today, I made sausage bread at home with just a few simple ingredients! The puff pastry comes out perfectly golden and crispy, and when you take a bite, the layers flake apart with a rich, buttery aroma. Inside, the sausage stays juicy, adding a savory yet mild flavor that pairs beautifully with the pastry. The crispy outside and tender sausage inside make it feel almost like a savory dessert, while still being filling enough as a snack. It’s simple to prepare, but the taste feels wonderfully refined — perfect not only for breakfast but also as a snack to serve guests. Be sure to grab the ingredients and try making it yourself!

짧은 영상이니 레시피 확인 부탁드립니다! #제품협찬 재료 -봉지 새우탕면 2개 -다진마늘 1스푼 -올리브유 2스푼 만드는 방법 1. 해동된 새우 다진마늘 새우탕면 라면스프 1개 넣고 버무려주세요. 2. 올리브유에 새우 구워주고 물, 라면 2개, 남은 라면스프 1개 넣고 2분 끓여주세요. 3. 불끄고 후첨 스프 넣어주면 완성입니다! 깊은 새우&해물 풍미에 후첨 분말스프를 더해, 더욱 깊고 시원하며 깔끔한 국물맛이 특징인 새우탕 봉지면이 새로 나왔어요! 건새우, 어포, 건미역 등 풍성한 건더기와 탄력 있는 면발로 쫄깃한 식감까지 더해져, 기존의 새우탕 큰사발면만큼 맛있습니다. 기존 컵라면은 얇은 면발의 꼬들꼬들한 매력이 있었다면, 새우탕 봉지면은 씹을수록 쫄깃한 면발과 푸짐한 건더기가 최고예요. 라면스프로 시즈닝한 새우를 한 번 구워주면 불맛까지 더해져, 술 마신 다음 날 먹으면 더욱 맛있는 해장 라면이 완성됩니다! 새로 나온 새우탕면을 꼭 구매하셔서, 미치게 시원한 해장 라면을 만들어 드셔보세요! Ingredients -2 packs of Shrimp Ramen (bag type) -1 tbsp minced garlic -2 tbsp olive oil Instructions 1. Mix the thawed shrimp with minced garlic and 1 ramen soup packet. 2. Sauté the shrimp in olive oil, then add water, 2 packs of noodles, and the remaining soup packet. Boil for 2 minutes. 3. Turn off the heat, add the finishing seasoning, and it’s ready! The new Shrimp Ramen (bag type) comes with a rich shrimp & seafood flavor, enhanced with the finishing seasoning for a deeper, cleaner, and more refreshing broth. With dried shrimp, fish flakes, dried seaweed, and other toppings, plus chewy noodles with a firm bite, it’s just as delicious as the original Shrimp Ramen Bowl. While the cup noodles had thin, springy noodles as their charm, the bag type offers chewier noodles and heartier toppings. If you season the shrimp with the ramen soup and grill them first, you even get that smoky flavor, making it the perfect hangover ramen the next day after drinking! #제품협찬 #새우탕면 #새우탕 #농심먹플루언서