인기 검색 계정


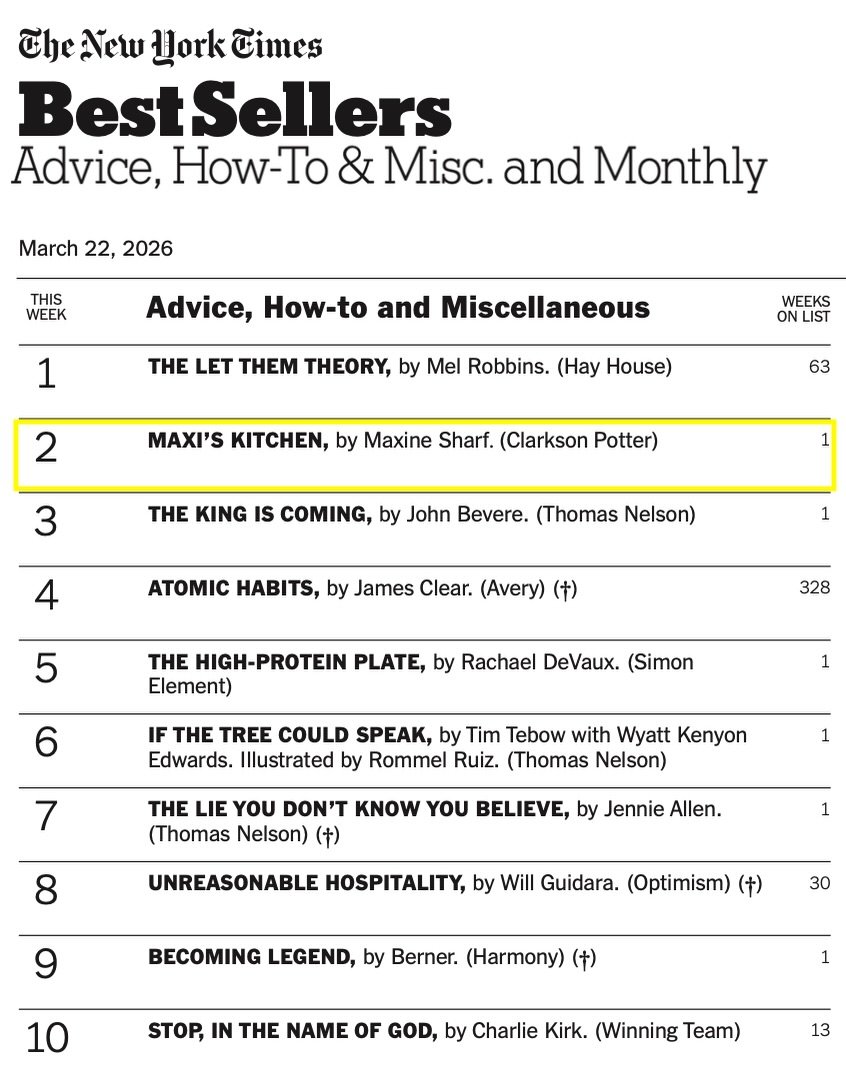
Maxine Sharf(@maxiskitchen) 인스타그램 상세 프로필 분석: 팔로워 3,130,051, 참여율 0.3%

@maxiskitchen
인증됨 비즈니스Maxine Sharf
✨Healthy easy recipes 👩🏽👧🏽Learned most of my dishes from my mom 📍Los Angeles, CA My cookbook is out now!! ⬇️
https://www.mkcookbook.com/@maxiskitchen님과 연관된 프로필

lindseyeats

wishbonekitchen

justine_snacks

wellmadebykiley

hungry.happens

nutritionbykylie

mediterranean.diet.plan

feelgoodfoodie

kalememaybe

alfiecooks

olivia.adriance


@maxiskitchen 계정 통계 차트
게시물 타입 분포
시간대별 활동 분석 (최근 게시물 기준)
@maxiskitchen 최근 게시물 상세 분석
동영상 게시물 분석
여러 장 게시물 분석
@maxiskitchen 최근 게시물
Maxi’s Kitchen is a New York Times bestseller!! It feels so surreal. This has been a dream of mine for so long, and it wouldn’t have been possible without all of you. Thank you for the love and support and for bringing this book into your kitchens. I appreciate each and every one of you so much, and I’m so happy the book feels as special as I hoped it would 🤍! Thank you to the team that helped bring this project to life, I couldn't have done it without you! @sanaelemoine @amyneunsinger @lizziehrt @francesboswell @jennsit @stephaniehuntwork @stephkuzma @jbranson @jinastanfill @monacreative @clarksonpotter @sarahmichelle123 @miaveetahlay @charcollie @noahswimmer 🤍
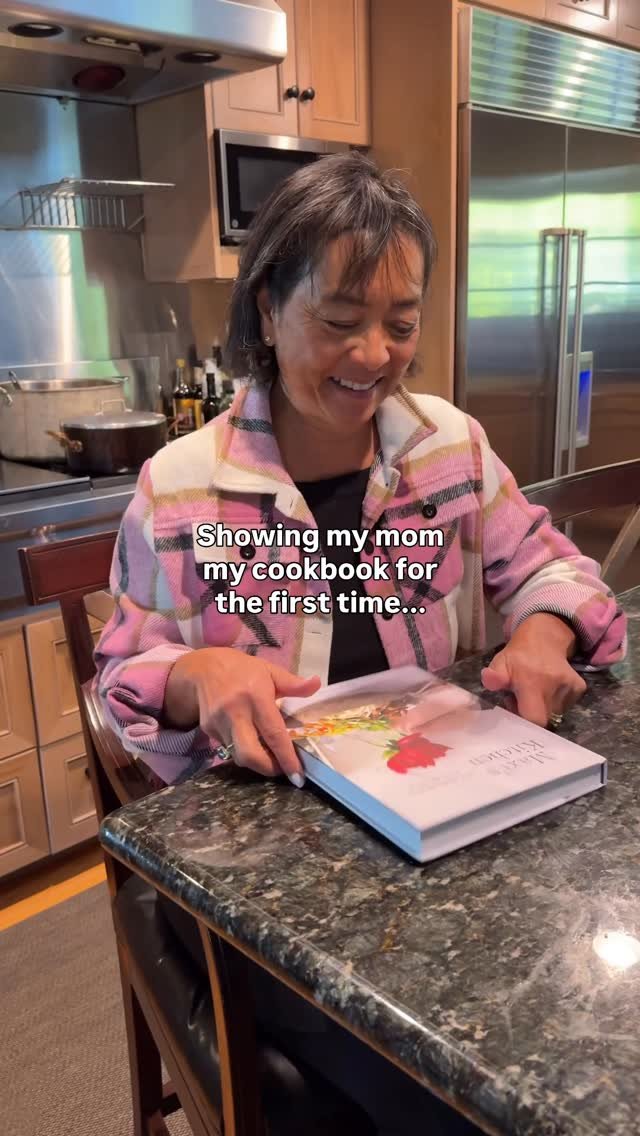
I didn’t expect this to be such an emotional moment 🥹🤍. My mom is the reason I love cooking and taught me almost everything I know. There would be no Maxi’s Kitchen without her. She’s my ultimate superpower and always has a way of breathing new life into my work. I love you so much, Mom, and I’m so happy the book feels as special as I hoped. Maxi’s Kitchen officially comes out March 3, 2026 and is available for pre-order via the link in my bio. Pre-orders are incredibly helpful for first-time authors, and your early support means the world 🥰!

it’s easy to look at someone’s success and assume it just happened overnight. what you don’t see are the years of believing in something before there was any proof it would work…. sometimes the first step isn’t working harder, but allowing yourself to believe that what you want is actually possible. learn how to build the life you dreamed about in our newest episode at the link in bio 🫶🏼
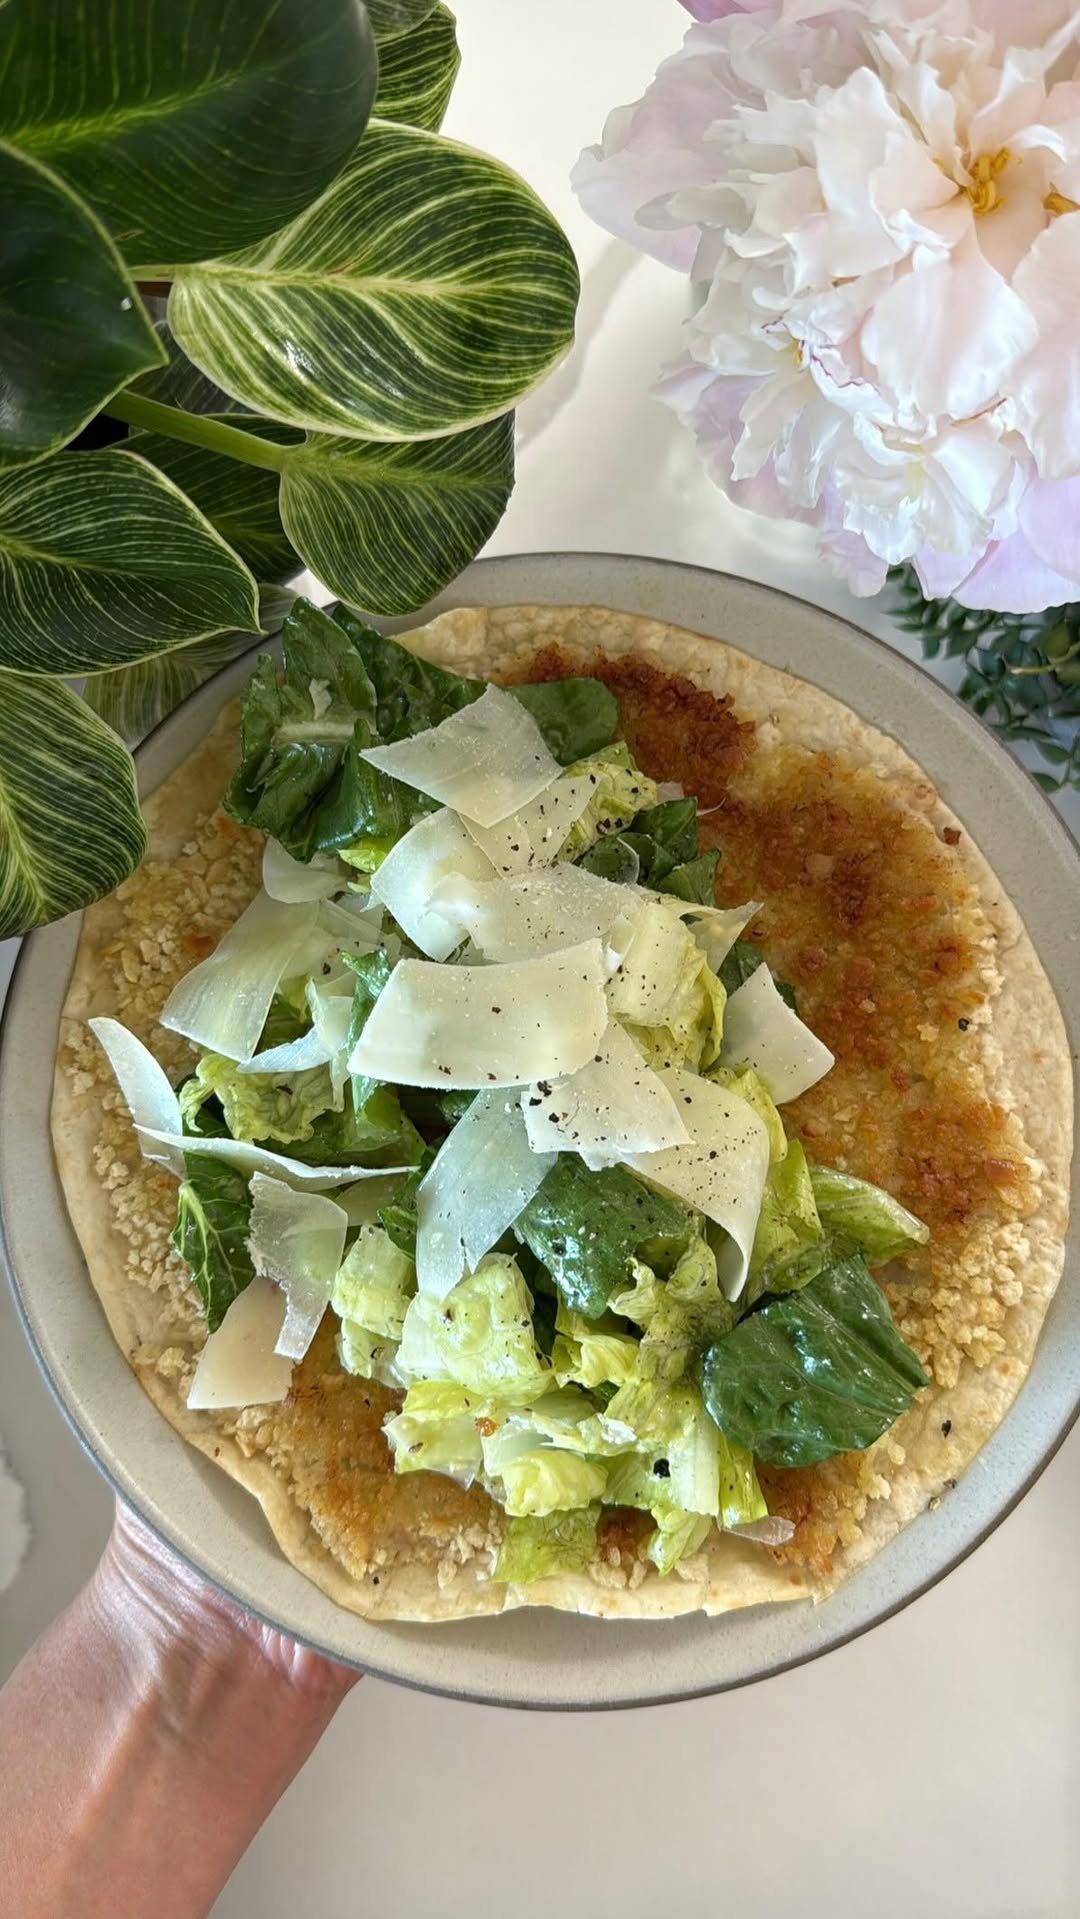
Crispy chicken caesar wrap✨ My debut cookbook is officially out now! Order with the link in my bio or search for Maxi’s Kitchen wherever you like to buy books. Recipe inspired by the smashed chicken caesar taco trend 😋 Dressing:▪️1 Large Egg Yolk▪️2 Tbsp Fresh Lemon Juice▪️1 tsp Dijon Mustard▪️1/4 Cup Extra-Virgin Olive Oil▪️1 Garlic Clove, grated▪️2 Tbsp Grated Parmesan Cheese▪️1/2 tsp Kosher Salt▪️1/2 tsp Freshly Ground Black Pepper▪️ Salad:▪️6 Cups Chopped Romaine Lettuce▪️1/2 Cup Shaved Parmesan Cheese, plus more for serving▪️Kosher Salt and Freshly Ground Black Pepper, to taste▪️ Chicken:▪️1 Tbsp Butter▪️1/2 Large Sweet Yellow Onion, finely diced▪️2 Large Garlic Cloves, finely chopped▪️1 lb. Ground Chicken (93/7 or similar)▪️1/3 Cup Grated Parmesan Cheese▪️1 Egg▪️1/2 tsp Kosher Salt▪️1/2 tsp Freshly Ground Black Pepper▪️ Wraps:▪️6 Flour Tortillas▪️1+1/2 Cups Panko Breadcrumbs, or more as needed▪️6 Tbsp Olive Oil, divided▪️ 1️⃣ Make the dressing: Whisk the egg yolk, lemon juice, and mustard. Slowly drizzle in the olive oil while whisking until emulsified. Whisk in the garlic, Parmesan, salt, and pepper. Prep the salad, but wait to dress until serving. 2️⃣ Make the chicken: In a skillet over medium heat, melt the butter. Add the onion and cook for 4-5 mins. Add the garlic and cook for 1 min. Transfer to a bowl and let cool slightly. 3️⃣ Add the ground chicken, Parmesan, egg, salt, and pepper and mix until just combined. 4️⃣ Pour the panko onto a plate. Spread about 1/2 cup chicken mixture onto one side of each tortilla, leaving a small border. Press chicken-side down into the panko to coat. 5️⃣ Heat 1 Tbsp olive oil in a skillet over medium heat. Working one at a time, cook the wrap chicken-side down for 3-5 mins until golden brown. Flip and cook for 1-2 mins until cooked through (chicken registers 165°F). Clear the pan and repeat, adding 1 Tbsp oil between each. 6️⃣ Toss the romaine with the Caesar dressing and Parmesan. 7️⃣ Top each wrap with Caesar salad and more shaved Parmesan. Fold into a wrap and enjoy! 25 min prep time / 40 min total time Makes 6
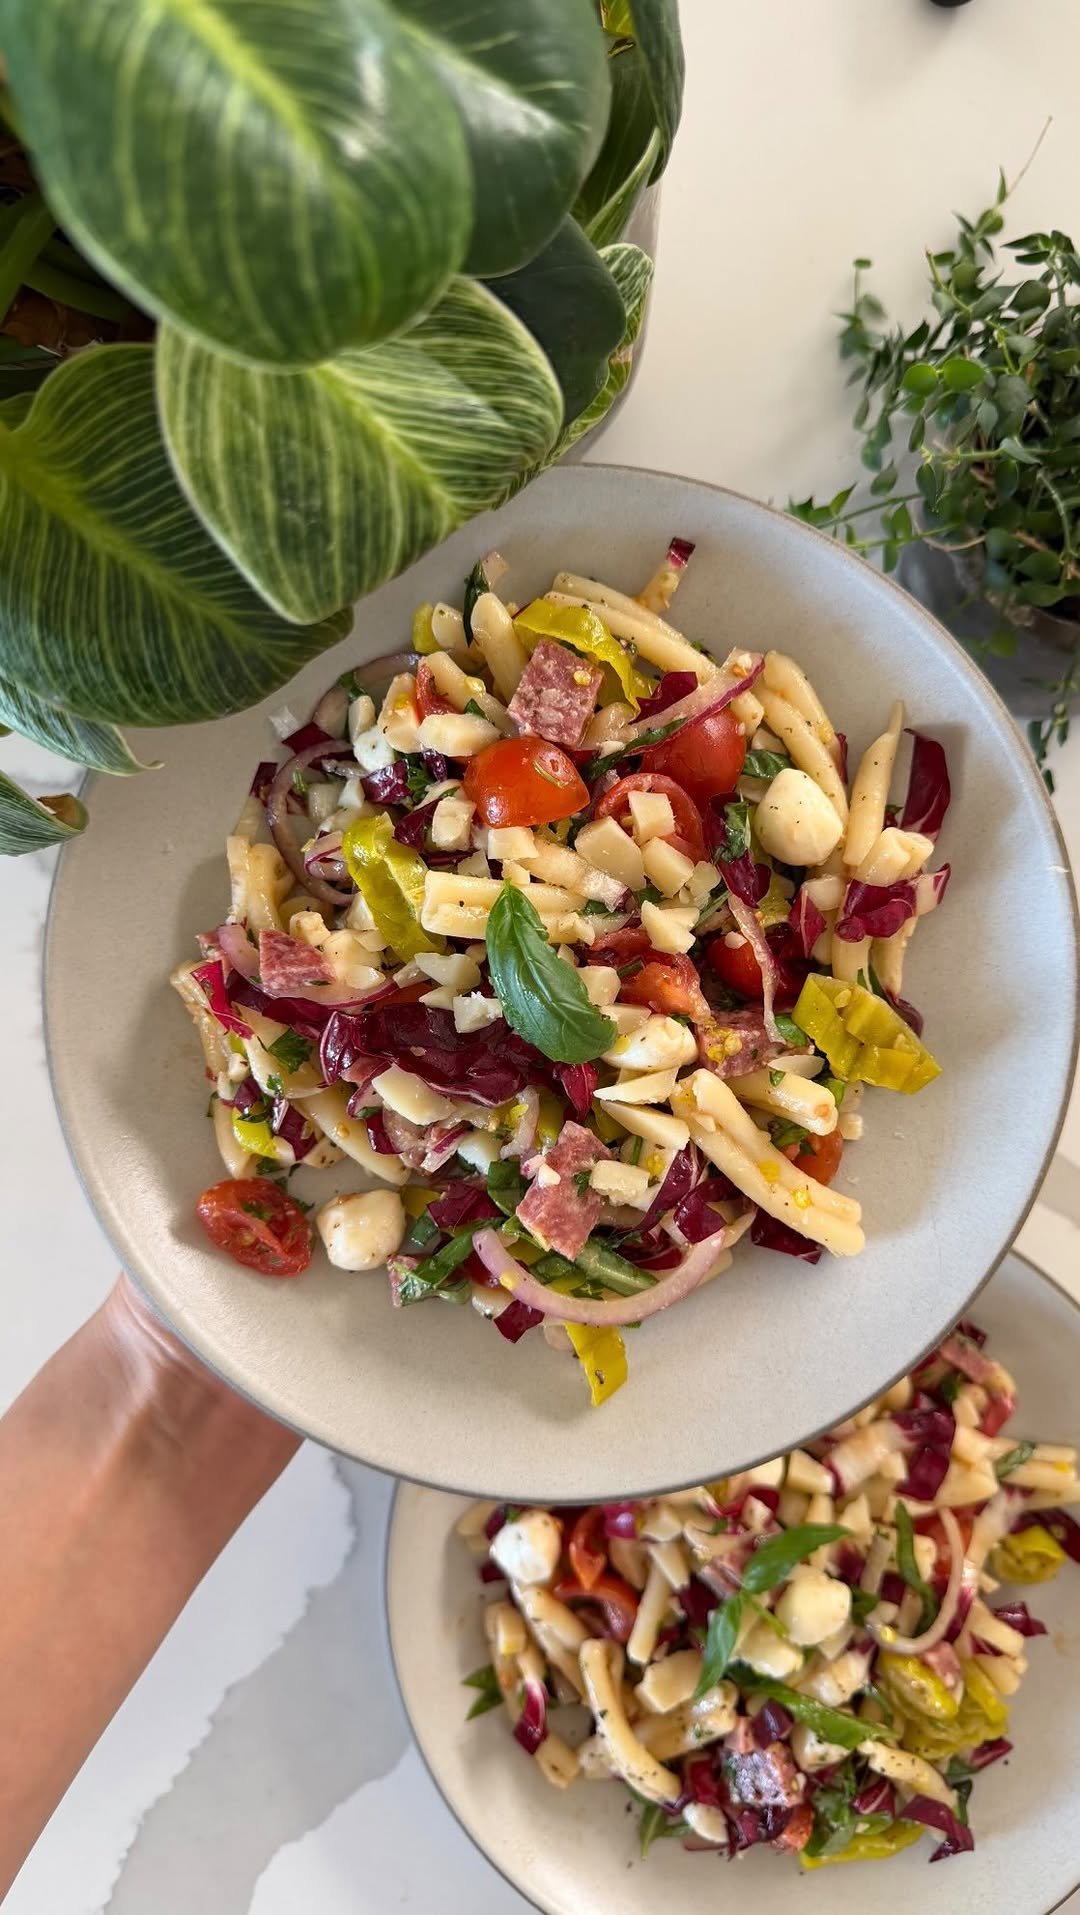
Italian chopped pasta salad✨ My debut cookbook is currently 38% off on Amazon for Prime Day! Order with the link in my bio or search for Maxi’s Kitchen on @amazon. Dressing:▪️3 Tbsp Olive Oil▪️3 Tbsp Red Wine Vinegar▪️1 Large Garlic Clove, grated or minced▪️1/2 tsp Dijon Mustard▪️1/2 tsp Dried Oregano▪️1/4 tsp Sugar▪️1/2 tsp Kosher Salt▪️1/4 tsp Pepper▪️ Pasta Salad:▪️8 oz. Casarecce or Other Short Pasta▪️1 Small Head Radicchio (6 to 8 oz), thinly sliced▪️4 oz. Salami, diced medium▪️6 oz. Fresh Mozzarella, cut in small cubes (3/4 Cup)▪️1/2 Cup Roughly Chopped Parmigiano-Reggiano (3 oz)▪️3/4 Cup Thinly Sliced Pepperoncinis▪️3/4 Cup Cherry Tomatoes, quartered▪️1/4 Red Onion (2.5 oz / 1/2 Cup), thinly sliced▪️1/2 Cup Fresh Basil Leaves, thinly sliced▪️1/4 Cup Chopped Fresh Parsley▪️ 1️⃣ Bring a large pot of salted water to a boil. Cook the pasta according to the package directions until al dente (or to your desired tenderness). Drain and rinse briefly under cold water, then shake off as much excess water as possible. 2️⃣ Make the dressing: In a small bowl, whisk together the red wine vinegar, garlic, Dijon mustard, oregano, sugar, salt, and pepper. Slowly drizzle in the olive oil while whisking until creamy. 3️⃣ Add the pasta, salami, mozzarella, Parmigiano-Reggiano, pepperoncinis, tomatoes, and red onion to a large bowl. 4️⃣ Just before serving, add the radicchio, basil, parsley, and dressing. Toss until everything is evenly coated. Taste and add more salt, pepper, or red wine vinegar if desired. Enjoy! Store any leftovers in an airtight container in the refrigerator for up to 3 days. 20 min prep time / 30 min total time Serves 4 as a main or 6 as a side Get all my recipes delivered to your inbox each week, complete with printable PDFs, when you subscribe to my newsletter (link in bio) 😘
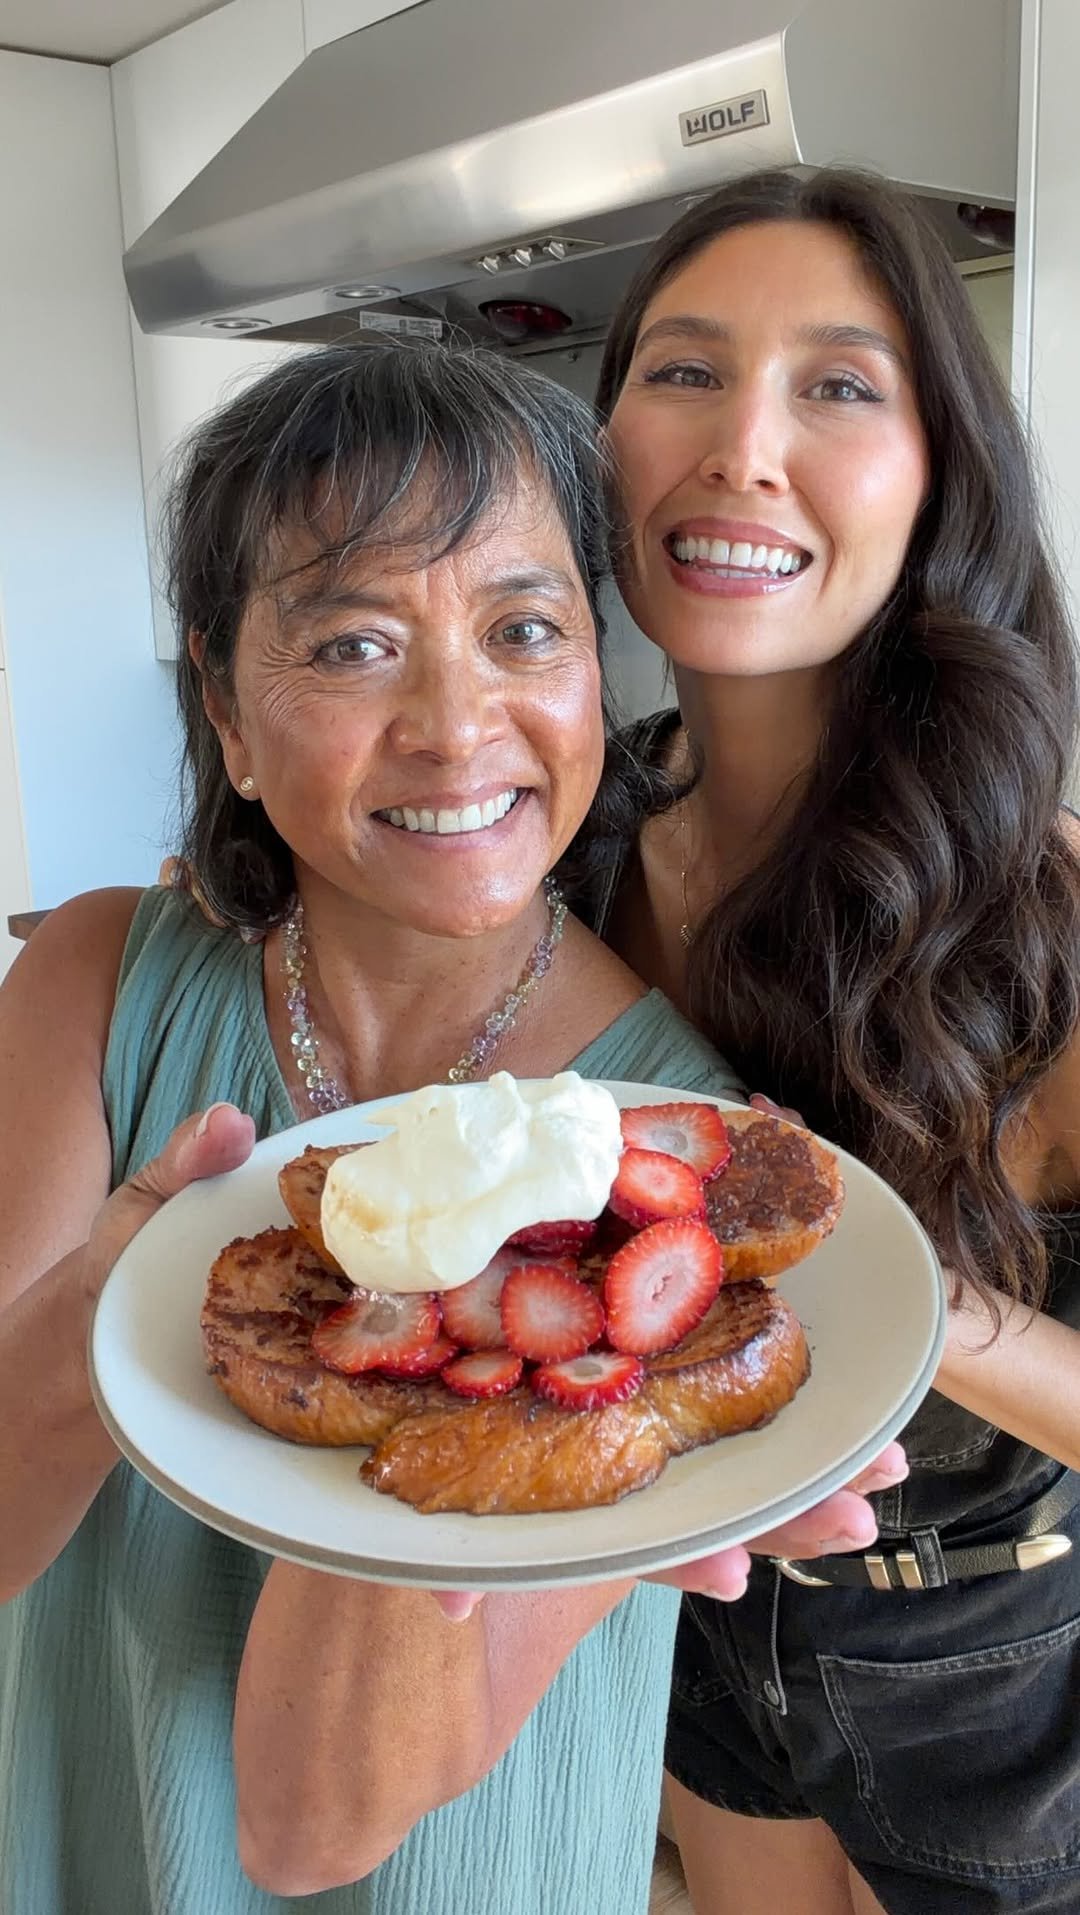
Strawberry french toast✨ In my family, we love French toast, and this strawberry version is perfect for summer. Challah is soaked in a beautiful pink custard made with strawberries and whole milk, which infuses it with rich, creamy flavor and adds protein and nutrients to fuel your day. @gonnaneedmilk #gonnaneedmilk #wholemilk #ad French Toast:▪️1 Cup Whole Milk▪️6 oz. Strawberries (~1 Cup), stems removed▪️1 Tbsp Maple Syrup▪️1 tsp Vanilla Extract▪️1/4 tsp Kosher Salt▪️3 Large Eggs▪️8 x 3/4-inch Slices Challah Bread▪️2 Tbsp Butter, plus more as needed▪️ Whipped Cream:▪️1 Cup Heavy Cream▪️2 Tbsp Powdered Sugar▪️1/2 tsp Vanilla Extract▪️ Serving:▪️Sliced Strawberries▪️Maple Syrup▪️ 1️⃣ Make the whipped cream: Add the heavy cream, powdered sugar, and vanilla extract to a large bowl. Using a hand mixer, beat on medium-high speed for 2-3 mins, until soft peaks form. Refrigerate until ready to serve. 2️⃣ Make the French toast: Add the milk, strawberries, maple syrup, vanilla extract, and salt to a blender. Blend until completely smooth. 3️⃣ Pour the custard into a 9x9-inch dish, or similar. Add the eggs and beat until combined. Add 3 slices of challah, or as many as fit in a single layer, and soak for 3 mins. Flip with tongs and soak for 3 more mins, until fully saturated but not falling apart. 4️⃣ Preheat a large nonstick skillet over medium heat. Melt 2 Tbsp butter, then add the French toast and cook for 2-3 mins per side, until golden brown. You can soak the remaining slices while the first batch cooks. Repeat with the next batch, adding more butter as needed. 5️⃣ Transfer the French toast to plates and top with whipped cream and sliced strawberries. Serve with maple syrup and enjoy! ⏲25 minute total prep + cook time Serves 4-6

Thai basil chicken✨ My debut cookbook is officially out now! Order with the link in my bio or search for Maxi’s Kitchen wherever you like to buy books. Sauce:▪️1 Tbsp Soy Sauce▪️1 Tbsp Dark Soy Sauce (or sub regular soy sauce)▪️2 Tbsp Oyster Sauce▪️1 Tbsp Fish Sauce▪️2 tsp Sugar▪️1/4 Cup Water▪️ Stir Fry:▪️2 Tbsp Avocado Oil (or other oil)▪️2 Large Shallots, sliced thin▪️4 Cloves Garlic, finely chopped▪️1 Fresno Chili (not very spicy), sliced in thin strips▪️1 Thai Chili (spicy), sliced in thin rounds▪️1 lb. Ground Chicken (96/4 or similar, not breast-only)▪️2 Scallions, sliced▪️2 Cups Fresh Basil or Thai Basil Leaves▪️4 Cups Cooked White Rice, for serving▪️ Eggs:▪️1 Tbsp Avocado Oil (or other oil)▪️4 Eggs▪️ 1️⃣ Mix together the ingredients for the sauce and set aside. 2️⃣ In a large wok or pan preheated over medium-high heat, add the oil and shallots. Cook, stirring, for 2-3 mins until tender, then add the garlic, fresno chili, and Thai chili. Cook, stirring, for 1 more min. 3️⃣ Add the ground chicken and cook for 3-4 mins until cooked through, breaking it up into small irregularly sized pieces. 4️⃣ Pour in the sauce and add the scallions. Cook, stirring, for 2-3 mins until the sauce coats the chicken and gets heated through, then turn off the heat and stir in the basil. Cover to keep warm while you fry the eggs. 5️⃣ In a separate pan preheated over medium heat, add oil to coat the pan then add the eggs. Fry eggs sunny side up with a sprinkle of salt until the white is set but the yolk is still runny. Tilt the pan, scoop up the hot oil with a spoon, and baste the top of the egg white to help it cook through. 6️⃣ Serve the basil chicken over warm rice with fried eggs on top and enjoy! ⏲15 min prep time / 30 min total time Serves 4 Get all my recipes delivered to your inbox each week, complete with printable PDFs, when you subscribe to my newsletter (link in bio) 😘
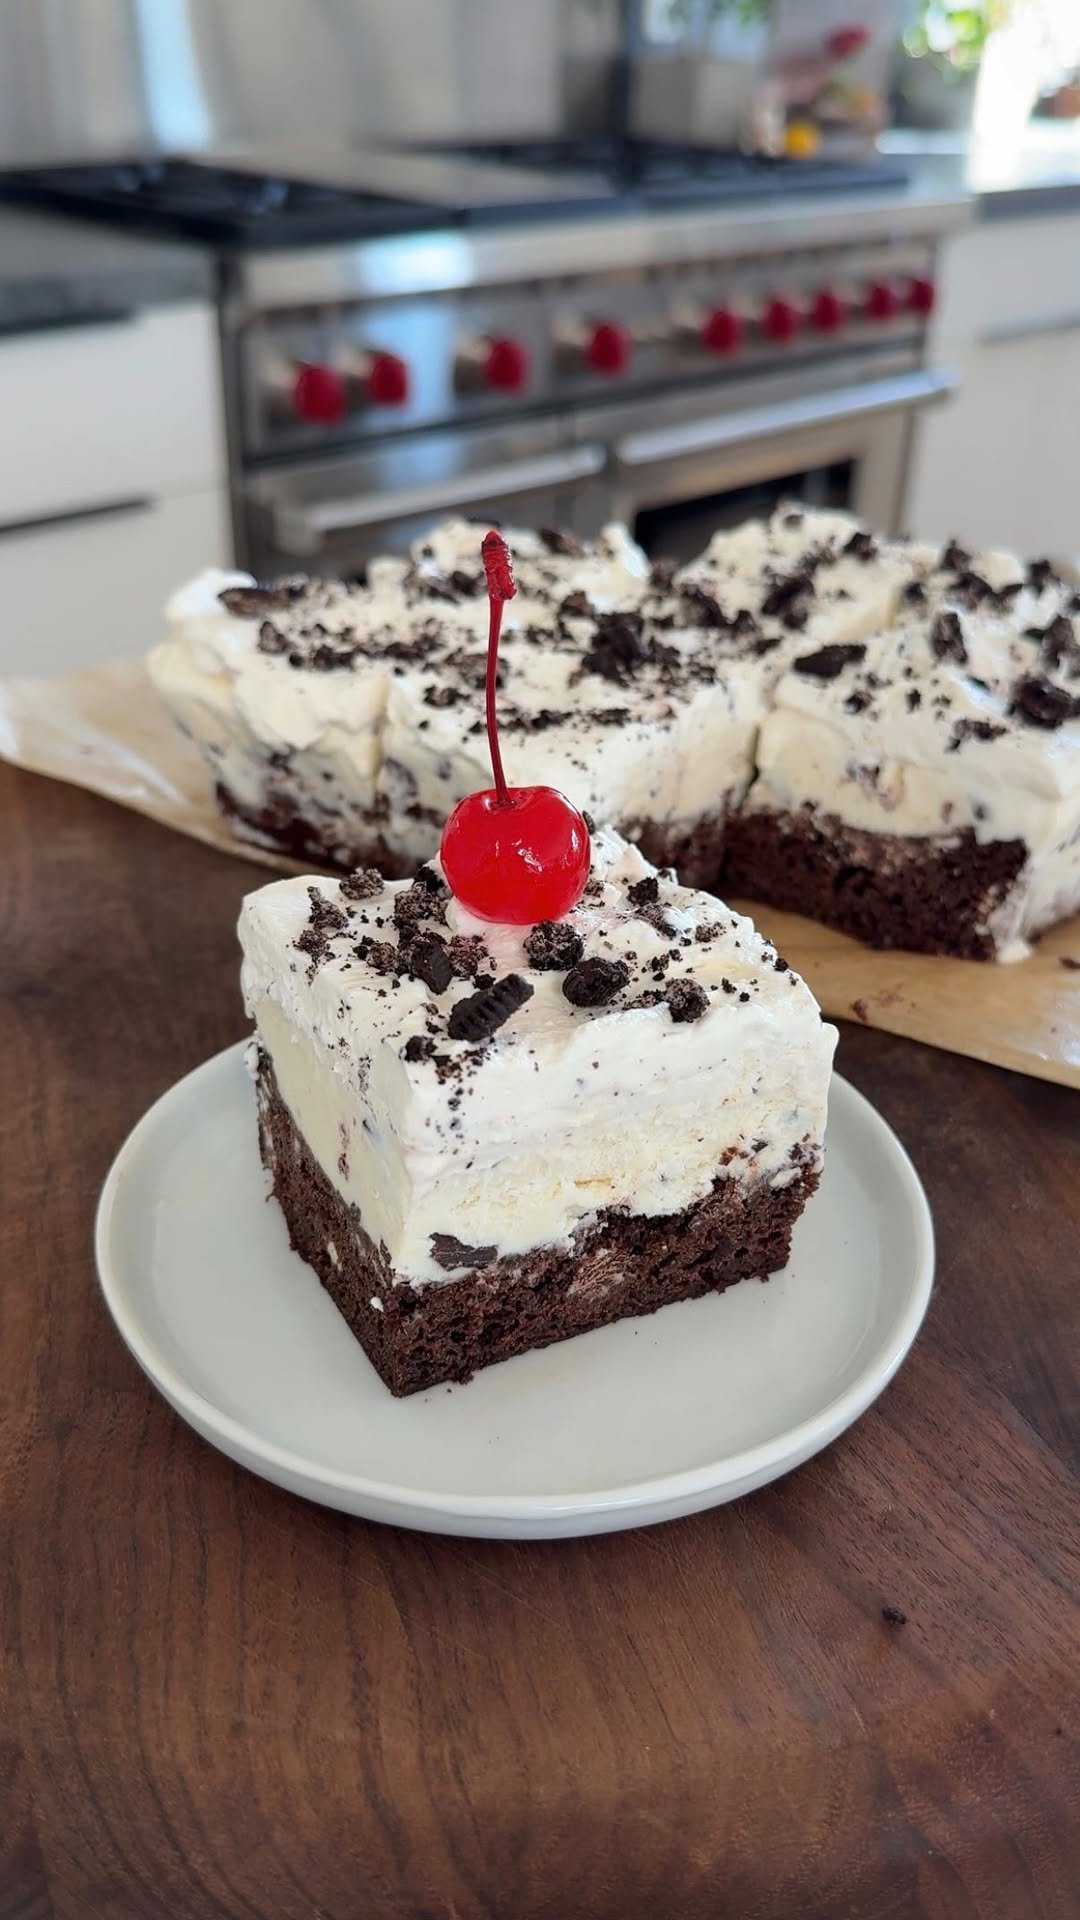
Ice cream cake✨ My debut cookbook is officially out now! Order with the link in my bio or search for Maxi’s Kitchen wherever you like to buy books. Cake:▪️3/4 Cup All-Purpose Flour▪️1/2 tsp Baking Soda▪️1/2 tsp Baking Powder▪️1/2 tsp Kosher Salt▪️1/4 Cup + 1 Tbsp Unsweetened Cocoa Powder▪️3/4 Cup Sugar▪️1/4 Cup + 2 Tbsp Vegetable Oil or Olive Oil▪️1 Egg▪️1/2 Cup Buttermilk▪️3/4 tsp Vanilla Extract▪️ Ice Cream Layer:▪️2 Pints Vanilla Chocolate Chip Ice Cream, or ice cream of choice▪️ Whipped Cream:▪️1 Cup Heavy Cream▪️2 Tbsp Powdered Sugar▪️1/2 tsp Vanilla Extract▪️ Topping:▪️3 Oreos, crushed▪️Maraschino Cherries (optional)▪️ 1️⃣ Preheat the oven to 325°F. Line an 8x8-inch baking dish with parchment paper, leaving overhang on all sides. 2️⃣ In a medium bowl, whisk together the flour, baking soda, baking powder, salt, and cocoa powder. 3️⃣ In a large bowl, whisk together the sugar, oil, egg, buttermilk, and vanilla until smooth. 4️⃣ Add the dry ingredients to the wet ingredients and whisk until just combined. 5️⃣ Pour into the prepared pan and bake for 25-30 mins, or until a toothpick inserted into the center comes out clean or with a few moist crumbs. Let cool completely. 6️⃣ Once cooled, soften the ice cream slightly by microwaving it for 15-30 secs, then scoop it on top of the cake. Spread into an even, compact layer with a spatula. Cover with plastic wrap and freeze for 2-3 hours, or until firm, up to overnight. 7️⃣ In a large bowl, beat the heavy cream, powdered sugar, and vanilla until medium-stiff peaks form. Spread evenly over the ice cream layer. 8️⃣ Sprinkle with the crushed Oreos. Slice into 9 squares and top each piece with a maraschino cherry before serving if desired. Enjoy! Storage: Freeze, tightly covered, until ready to serve. For best texture, enjoy within 1-2 weeks, or freeze for up to 1 month. Let sit at room temperature for 5-10 mins before slicing. ⏲ 25 min prep time / 5 hours total time Serves 9 Get all my recipes delivered to your inbox each week, complete with printable PDFs, when you subscribe to my newsletter (link in bio) 😘
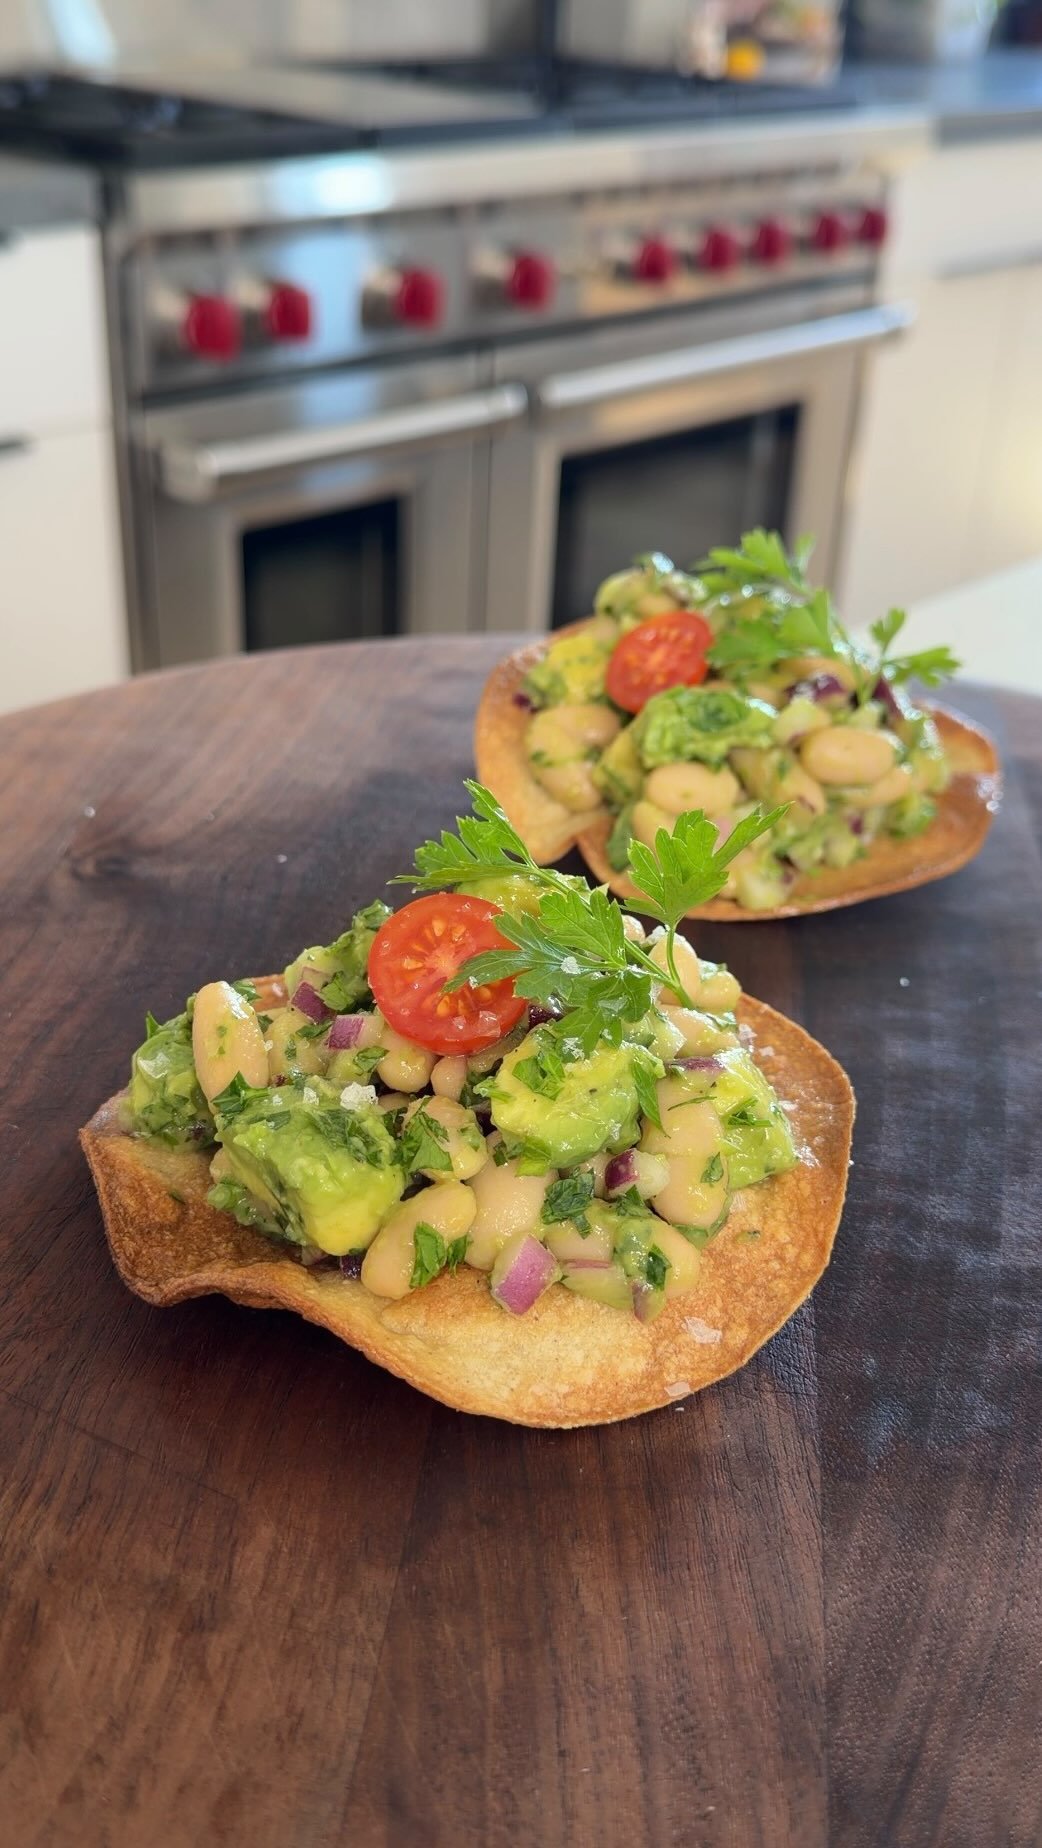
Healthy white bean avocado tostadas✨ My debut cookbook is officially out now! Order with the link in my bio or search for Maxi’s Kitchen wherever you like to buy books. Tostadas:▪️2 Tbsp Olive Oil▪️6 Corn Tortillas (I use Guerrero brand)▪️Kosher Salt▪️ Dressing:▪️2 Tbsp Fresh Lemon Juice▪️1 Large Garlic Clove, grated or finely chopped▪️1 Tbsp Olive Oil▪️1/2 tsp Dijon Mustard▪️1/2 tsp Honey▪️1/2 tsp Kosher Salt▪️1/4 tsp Freshly Ground Black Pepper▪️ White Bean Avocado Salad:▪️1 x 15 oz. Can Cannellini Beans or Other White Beans, drained and rinsed▪️1 Large Ripe Avocado (or 1+1/2 Small Ripe Avocados), peeled and diced large▪️1/2 Cup Small Diced Red Onion▪️1/4 Cup Chopped Fresh Parsley▪️Flaky Salt, for serving▪️Cherry Tomato Halves, for serving (optional)▪️Fresh Parsley Leaves, for serving (optional)▪️ 1️⃣ Make the tostadas: Preheat the oven to 400°F on convection mode (or 425°F regular bake) and drizzle the olive oil on a large baking sheet. 2️⃣ Rub both sides of each tortilla in the oil and sprinkle with salt. Bake for 6 mins on the first side, flip and bake for 3-5 more mins, until deep golden brown and crispy. 3️⃣ Meanwhile, make the dressing: In a small bowl, add the lemon juice, garlic, olive oil, Dijon mustard, honey, salt, and pepper. Whisk until combined. 4️⃣ Make the salad: In a medium bowl, add the white beans, avocado, red onion, and parsley. Pour on the dressing and gently mix until all ingredients are evenly distributed, being careful not to fully mash the avocado. Taste and season with more lemon juice or salt if desired. 5️⃣ Spoon the white bean avocado salad onto the tostadas and sprinkle with flaky salt. Garnish each with one cherry tomato half, if using, and a fresh parsley leaf. Enjoy! ⏲15 min prep time / 30 min total time Recipe serves 2 as a light meal or 6 as an appetizer Get all my recipes delivered to your inbox each week, complete with printable PDFs, when you subscribe to my newsletter (link in bio) 😘
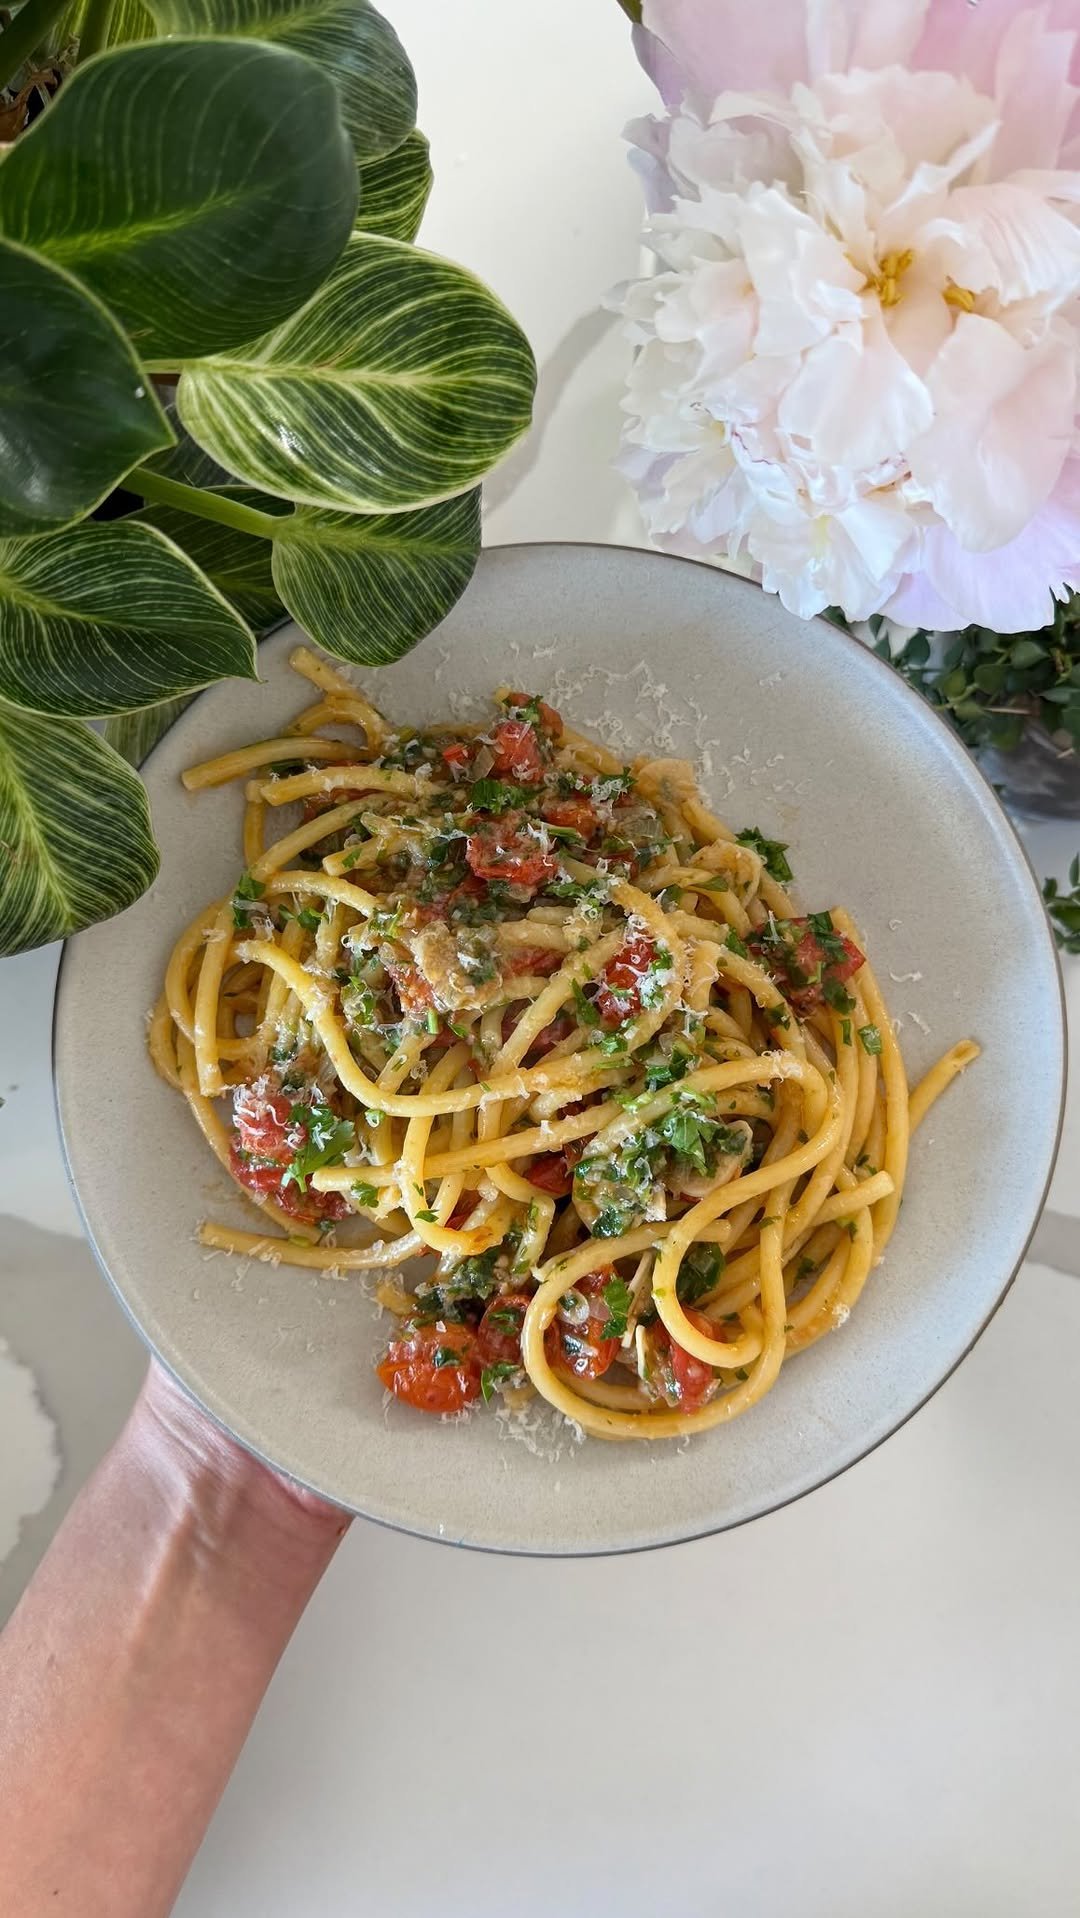
Summer cherry tomato bucatini✨ My debut cookbook is officially out now! Order with the link in my bio or search for Maxi’s Kitchen wherever you like to buy books. ▪️8 oz. Bucatini (1/2 package), see Notes▪️Kosher Salt▪️1/4 Cup + 2 Tbsp Olive Oil▪️1 Large Shallot, finely diced (3 oz.)▪️4 Large Garlic Cloves, thinly sliced▪️1/2 tsp Red Pepper Flakes▪️12 oz. Cherry Tomatoes on the Vine, half of the tomatoes cut in half, the rest left whole▪️1 Tbsp Fish Sauce (trust me! see Notes)▪️Freshly Ground Black Pepper▪️1/2 Cup Pasta Water▪️1/2 Cup Finely Chopped Fresh Parsley▪️1 Tbsp Freshly Squeezed Lemon Juice▪️Freshly Grated Parmesan Cheese (optional)▪️ 1️⃣ Bring a large pot of generously salted water to a boil. 2️⃣ Meanwhile, heat the olive oil in a large skillet over medium low heat. Add the shallot, and cook, stirring occasionally, until softened, 3 to 4 mins. 3️⃣ Add the garlic and red pepper flakes. Cook, stirring constantly, until fragrant, 1 to 2 mins. Do not let the garlic brown. 4️⃣ Add the cherry tomatoes, fish sauce, 1/4 tsp kosher salt, and 1/4 tsp black pepper. Increase the heat to medium and cook, stirring occasionally and gently smashing some of the tomatoes with the back of a spoon, until they begin to release their juices, 3 to 4 mins. Turn off the heat. 5️⃣ Add the bucatini to the boiling water and cook until before it’s al dente, 2 mins less than package directions. Reserve 1 cup pasta water, then transfer the pasta directly to the skillet. 6️⃣ Turn the heat back to medium and add 1/2 cup pasta water. Toss continuously until the pasta finishes cooking and the sauce coats the pasta, about 2 to 3 mins. Add more pasta water as needed to keep it glossy and loose. 7️⃣ Remove from heat and stir in the parsley and lemon juice. Taste and add more salt or pepper if desired. 8️⃣ Serve with freshly grated Parmesan, if desired, and enjoy! Notes: If making this with 1 lb. pasta, double the amounts of all the other ingredients. The fish sauce adds so much depth and umami to this dish, and it doesn’t taste fishy in the final product. If you’re vegetarian, you can omit the fish sauce and add 1/2 tsp kosher salt instead. Serves 2-3

Behind the scenes of a cooking sprint with my mom 🥰 About once a month, my mom flies from SF to LA and we spend three days developing and filming recipes together. Usually around recipe two of the day, I start to hit a wall, and she’ll say, “We can do one more!” And somehow, we always do. She does all the grocery shopping, the cleaning, and the pep talks. She is my ultimate superpower, and I wouldn’t be where I am or who I am without her. I feel so grateful this work has given us so many memories together. Thank you for being here and supporting my page!
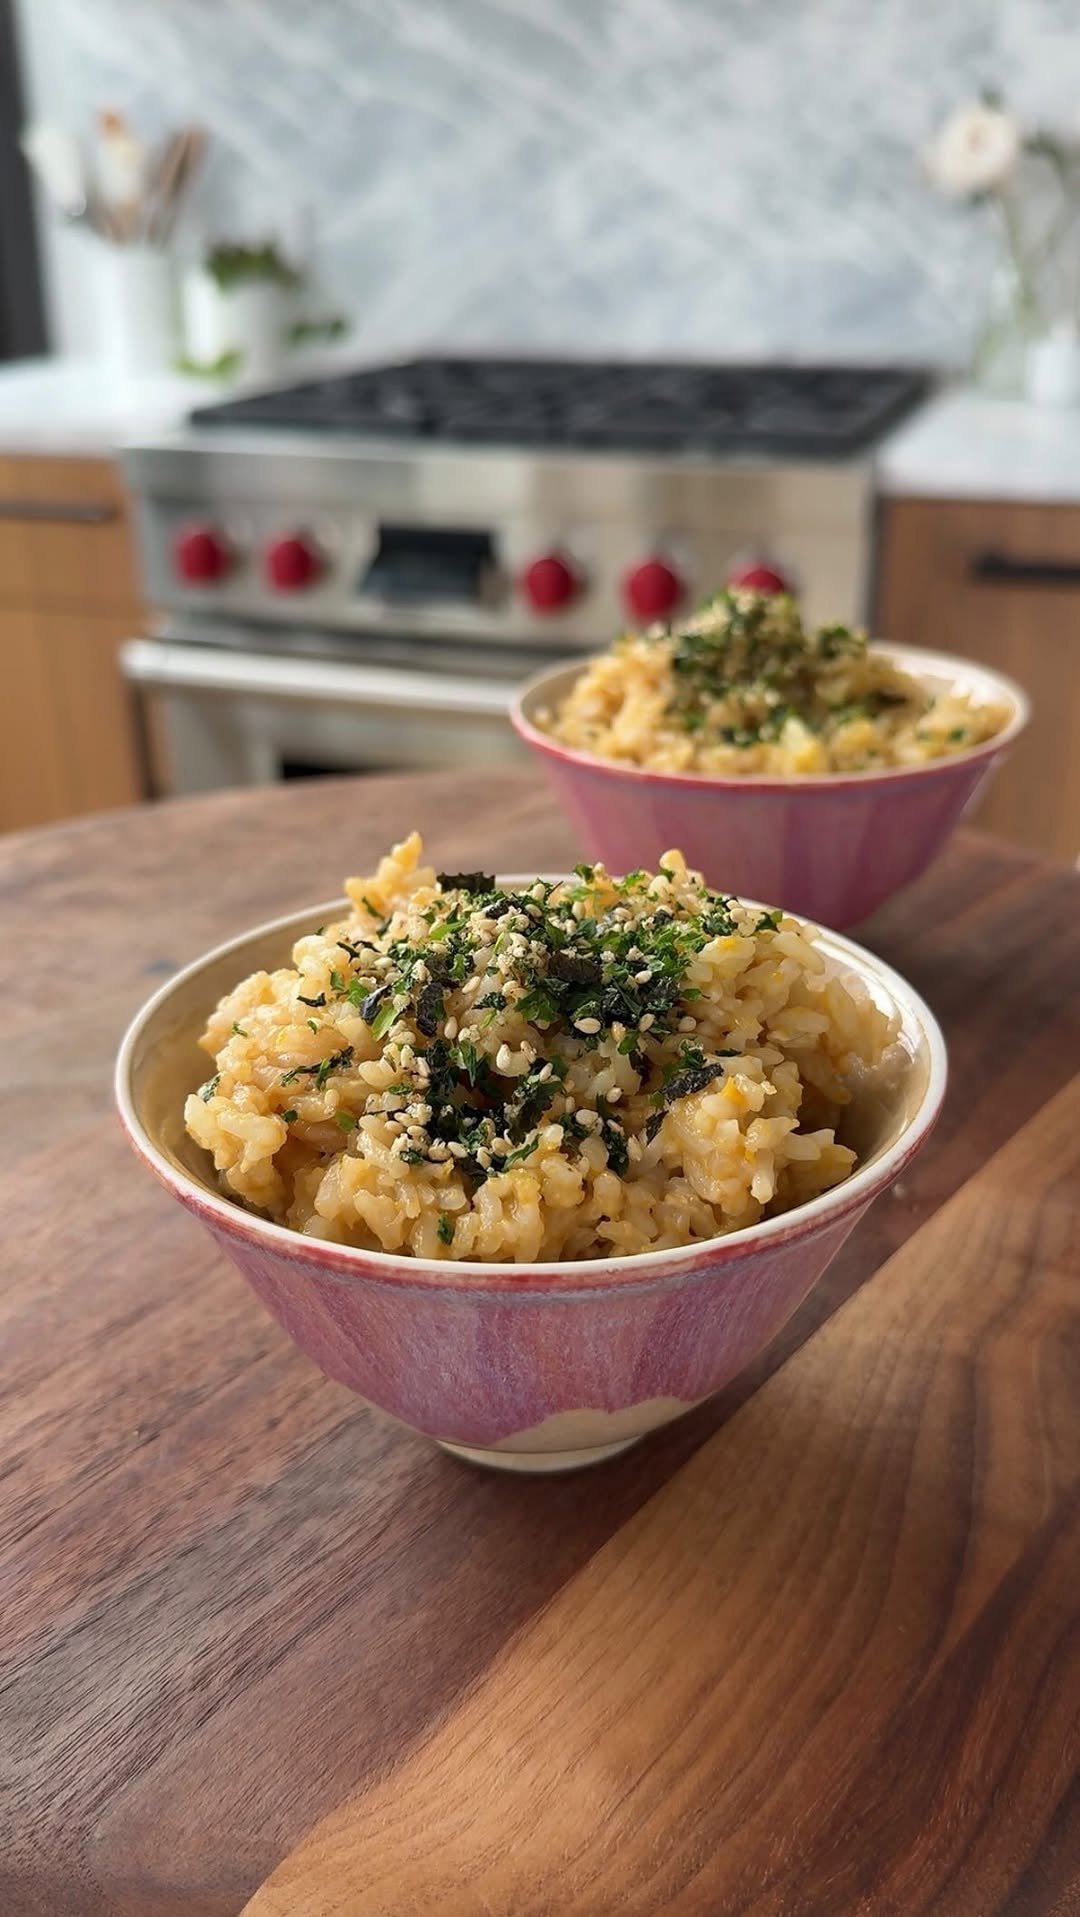
Grandpa’s eggy rice✨ My debut cookbook is officially out now! Order with the link in my bio or search for Maxi’s Kitchen wherever you like to buy books. ▪️1 Cup Sushi Rice (we use Nishiki), uncooked▪️1+1/4 Cups Water▪️1/4 tsp Kosher Salt▪️2 Eggs▪️1 Tbsp Soy Sauce▪️Furikake Rice Seasoning▪️ 1️⃣ Place the rice in a medium bowl and cover with water. Gently swish with one hand, then drain the water. Repeat with fresh water, swishing and draining, until the water is no longer opaque (this is to remove the starch from the rice). Drain the rice in a fine-mesh sieve and transfer to a small pot. 2️⃣ Add the water and salt and bring to a boil over medium-high heat. Cover, reduce the heat to low, and cook for 15 mins (don’t uncover!). Remove from the heat and keep covered for 10 mins. 3️⃣ Remove the lid and immediately crack the eggs into the pot. Using a large spoon, stir the eggs with the rice until well combined. (They will get cooked by the residual heat). Stir in the soy sauce. 4️⃣ Serve in bowls and sprinkle with furikake. We like to add more as we eat so every bite gets some seasoning. Enjoy! ⏲5 min prep time / 30 min total time Recipe serves 2-4 Get all my recipes delivered to your inbox each week, complete with printable PDFs, when you subscribe to my newsletter (link in bio) 😘